Frequently Asked Questions
View our FAQs to get self-help with some of our most often asked questions. Select a Category from the drop-down menu to get started.
- How much food can I fit in the frying basket?
Quantity of food depends on the size of the basket. Best cooking performance occurs when air can easily flow around the food being cooked. General rule is to avoid filling the basket more than 1/2 full. The smaller the food being cook, the more likely the food will nestle together.
Allowing space between pieces of food will allow hot air to flow through and between the food. Baskets with multiple layers of food (such as French fries) will need to be shaken partially through the cooking cycle. Please see your Use & Care for additional suggestions.
Some maximum food sizes are:
French fries: approximately 1 lb. (16 oz.)
Whole chicken wings: 6 pieces
Chicken legs: 3-4 (depending on size)
Fish fillets: 2 (6 oz.) fillets
Steaks: 1 (6 oz.) steak
Muffins: 4 (standard cupcake size)
Vegetables: 1/2 lb. - 1 lb., depending on typeAir fryer models 35050 and 35051 have a cooking frying basket that is 7" in diameter and 4" in height. Remember to allow space between pieces of food to allow hot air to flow through, and multiple layers of food (such as French fries) will need to be shaken partially through the cooking cycle. Please see your Use & Care for additional suggestions.
- What can I cook in the air fryer?
You can cook a wide variety of foods in an air fryer, from snacks and appetizers to meats and seafood. Frozen foods like chicken nuggets, mozzarella sticks, and fish sticks can all be cooked using air fry technology. You’ll get even browning on the outside of steaks, pork chops, burgers, and chicken wings while keeping the inside flavorful and juicy. Even delicate vegetables, flaky fish fillets, muffins and pastries can be cooked in an air fryer. There are many online groups that offer recipes.
Refer to your Use & Care for foods, amounts, settings, and cooking times.
- How much oil do I need to use?
Most foods, including frozen foods, will require no oil at all. If you desire an extra-crispy texture, just a light misting of vegetable oil will do the trick. Fresh foods, like chicken wings will require a misting of oil to have a browned and crisp appearance.
- Should I pre-heat the air fryer?
There’s no need to pre-heat your air fryer. Just place the food directly into the frying basket, select your time and temperature or choose from one of the 6- pre-programmed cooking settings. The air fryer will alert you with an audible beep when your food is ready. Near the end of the cycle you can check for doneness and adjust the length of the cooking cycle as needed.
- Do I need to shake the basket during cooking?
When cooking foods that are layered in the basket (such as French fries), shaking the contents of the basket is necessary to ensure even cooking and to prevent the pieces from sticking together. It's a good idea to shake the basket periodically when cooking most foods so all surfaces are exposed to the air flow.
- Can I use aluminum foil in the air fryer?
We do not recommend using aluminum foil or parchment paper in the basket because it can block the air flow, which is essential for proper operation of an air fryer.
- How do I clean the air fryer?
Before cleaning, make sure the air fryer is unplugged and has cooled completely. Remove the nonstick frying basket and the pan and wash in hot, soapy water. The outside of the air fryer can be wiped with a soft, damp cloth. Do not use harsh cleaners or sponges. You can clean the interior of the air fryer by simply wiping it down with a damp cloth.
- Air fryer doesn’t work.
- The appliance isn’t plugged in. Plug into electrical outlet.
- The timer hasn’t been set. Follow “How to Use the Air Fryer” in your Use & Care to set timer.
- Food isn’t cooked.
- Too much food in the Removable Basket. Increase cooking time and continue to cook.
- The temperature was set too low. Increase the temperature and continue to cook.
- Food cooked unevenly.
Too much food in Removable Basket. Shake food halfway through cooking time.
- Fresh vegetables are not crisp enough.
- Cooking time too short. Increase cooking time and continue to cook.
- Temperature is too low. Increase temperature and continue to cook.
- Fresh French fries not crisp.
- Add a small amount of vegetable oil, enough to lightly coat potatoes.
- Pieces are too large. Cut potatoes smaller or thinner next batch.
- Smoke coming from air fryer.
Excessive oil dripped into the Pan or splattered onto the heating coils. Only use small amounts of oil in air fryers.
- Meat or poultry isn’t cooked enough.
Too much food in Removable Basket. Meat and poultry should be cooked in a single layer for even cooking. Refer to the USDA website for proper cooking doneness temperatures.
- What is the difference between the Pet Air Purifier and Allergen Air Purifier?
Both use a permanent HEPA filter to remove Captures 99% of Pet Dander, Dust, Dust Mites, Pollen, and Mold / Mildew Spores As Small as 3 Microns From the Air.
The Pet Air Purifier also includes a Pre-Filter to remove pet hair and airborne particles and 2 Zeolite Carbon filters to address pet odors.
All TrueAir Air Purfiers can have Carbon Filters installed in the filtering process. Carbon filters can be purchased on Amazon or by visiting hamiltonbeach.com.
- Do the TrueAir Air Purifiers use a permanent filter?
Yes, the TrueAir purifiers use a permanent HEPA - Grade Filter that can be vaccuumed clean and saves you money.
- Where can I buy replacement HEPA filters?
Replacement HEPA - Grade Filters can only be purchased online at hamiltonbeach.com.
- What things does the Air Purifier remove from the air?
This air purifier is 99% effective in removing things like Pet Dander, Dust, Dust Mite Debris, Pollen, Mold / Mildew Spores, and smoke as small as 3 microns.
- What size room can this Filter?
The TrueAir Purifiers can cover 160 sq. ft with effective performance. The Pet Air Purifiers can cover 140 sq. ft with effective performance.
- How does the Air Purifier Allergen Reducer work?
The Allergen Reducer functions as an air cleaner by helping to remove particulates (such as pet dander, dust, pollen, mold / mildew spores, and smoke) from the air. The air is cleaned in three stages:
- A fan draws air through the sides of the front panel.
- The permanent filter than removes particles as small as 3 microns from the air at 99% effectiveness.
- The purified air is then released through the back of the unit.
- Why is my Air Purifier not removing a lot of particulate out of the air?
For optimum performance, make sure the Air Purifier is placed in a central location with adequate air circulation. Do not block the air intake and outlet grills with drapes, curtains, or blinds.
If there still is reduced performance, the Air Purifier carbon filters may need to be replace and / or the HEPA filter may need to be cleaned.
- Why is my Air Purifier not turning on?
Make sure the unit is plugged in and the control knob is on.
- How do I clean the Air Purifier?
- Unplug the Air Purifier from wall.
- Remove Front Panel.
- Remove the Filter Straps.
- Remove and throw out Replaceable Carbon Filters. (If applicable)
- Vacuum Permanent HEPA Filter. Remove from purifier if needed.
- Remove and vacuum Pre-Filter. Replace when completed. (If applicable)
- Replace Permanent HEPA and Carbon Filters. (If applicable)
- Replace Front Grill.
- How often should I replace the Carbon Filters?
Carbon Filters should be replaced every 90 days, or sooner, depending on usage conditions. TrueAir offers 3 types of replacement filters those that are best suited to tobacco, pet or usual household odors. Any of these can be used as replacements.
Remember to replace your timestrip cartridge when doing so.
- Where can I purchase replacement Carbon Filters?
Replacement Carbon Filters may be purchased online through a number of eRetailers. The filters can also be purchased by visiting hamiltonbeach.com.
The following model numbers are currently available:
- 04230G - All-Purpose Carbon Filter 3-Pack
- 04231GW - Air Filters 3-Pack for Smoke Odors
- 04234G - Air Filters 3-Pack for Pet Odors
- 04290G - Single, All-Purpose Carbon Filter
- 04291G - Single, Filter for Smoke Odors
- 04294G - Single, Filter for Pet Odors
- How big is the Air Purifier?
Dimensions (inches): 13.5 H x 6 W x 8.5 D
- How do you replace the Timestrip Cartridge?
- Press firmly on Foil Bubble on the cartridge to activate. A red line will appear a few moments later on the left side of the holder to indicate it has been correctly activated.
- Slide activated Cartridge into the Plastic Holder on unit.
- The activated Cartridge will "count down" for 2 months, indicating that it is time to replace the filter.
- How do I install the replacement carbon filters?
- Remove Front Grill.
- Remove the Filter straps.
- Remove and throw out Replacement Carbon Filters. Vacuum HEPA Filter if needed.
- Place new Replacement Carbon Filter on HEPA Filter.
- Place Filter Strap over Carbon Filter and snap into Housing.
- Replace Front Grill.
- How do I remove the base?
Pull tab towards the back of the Air Purfier to remove the base.
- Do the TrueAir Air Purifiers use an Ionizer?
No, the TrueAir Air Purifiers do not use an Ionizer.
- Do TrueAir Air Purifiers capture the coronavirus?
Air purifiers capture a wide range of particle sizes that are airborne and pass through the filter media, some of which may be even smaller than the size of coronavirus similar to that of COVID-19. Although TrueAir Air Purifiers help reduce MS2 bacteriophages and virus loads in the air, more research needs to be done to understand how air purifiers mitigate transmission of airborne illnesses. In the meantime, we recommend that all consumers follow CDC guidelines for protecting oneself from COVID-19 and continue to use their TrueAir Air Purifiers to improve their indoor air quality.
- Can I crush ice in my blender, even if I don’t have the "ice crush" feature?
Yes. Always cover ice with a liquid and process in small batches, using the highest speed available, and pulse until satisfied with texture.
- Can I chop dry ingredients in my blender?
Yes. Always process in small batches and Pulse on and off (limiting run time) until mixture is at its desired texture.
Helpful Hint: Stop and shake or stir container often. - Can I blend dry rice and beans in my blender?
Yes. You can blend rice and beans in the blender to make flour. We recommend that you limit the quantity to 2 cups or less at a time.
- How do I process raw vegetables?
Process in small batches.
- Cut food into small pieces and drop in container
- Cover with cool water
- Use the High speed and pulse, shake or stir often
- Drain
- Are there recipes available?
Yes.
- I have a blender with a dispensing spout. What is the best way to dispense thicker items?
Turn motor on low and allow to run while dispensing.
- What is the container made of?
Styrene or glass
- What are the blades made of?
They are made of stainless steel.
- What is the gasket made of?
The gasket is made of EPDM rubber. It is made from material approved for food contact by the FDA, Food & Drug Administration, and by NSF, National Sanitary Foundation.
- Can I change the motor clutch?
>No. Internal parts (for your safety) are not available. Please contact Customer Service for further assistance.
- What would make the motor smoke?
A "smoking motor" is usually caused from binding between the cutting unit clutch and the cutting assembly which connects to the motor. Unplug the blender and allow to cool. Once the blender is cool, check the cutting assembly (see the Use and Care instructions for your model for a parts diagram) to see if the blades "spin freely." Be careful, the blades are sharp. If the blades do not spin freely, the cutting unit needs to be replaced. Once the blender base (without container) is cool, plug it in and turn it on to see if it works properly. (If the unit was not turned off when the cutting unit locked, the motor could be damaged.)
- Should my new blender smell during use?
New units sometimes burn off excess varnish/oils from the manufacturing process. This is normal and the smell should go away. If the smell does not go away after the first couple of uses, discontinue using the blender.
- Why does the container carry an odor?
Depending on the type of ingredient, an odor may linger within the container; simply store the container without the lid.
Helpful Hint: Rinse the container with a little diluted bleach and water solution. - What are the different options or speeds for?
The speeds give flexibility in the amount of power allowed from the motor to satisfy a variety of blending applications.
Helpful Hints:- Our Home Economist says that she uses High and Pulse for almost everything.
- Replacement cutter assemblies can be purchased at many discount or department stores or through the Consumer Affairs group at 1-800-851-8900.
- How much does the speed change (i.e. current, rpm) between each push button switches?
On 350W – 6, 7, 8 and 10 speed blenders there is about 500 rpm difference between each consecutive button, and about 2500 rpm difference from LO to HI. On 450W – 10, 12, 14 and 16 speed blenders there is about 300 rpm between each consecutive button, and about 2500 rpm difference from LO to HI.
- Why is the Peak Power wattage higher on the carton then the wattage rating on the bottom of my blender?
The blender pulls a higher wattage the first few seconds that it is turned on. This is Peak Power and is important because the first few seconds are the most strenuous on the motor.
- What’s the best way to disassemble the jar for cleaning?
Place the blender jar on the base and turn the handle counter clockwise to loosen.
- Are any of the parts dishwasher safe?
It differs among models and types of material used for your specific blenders. It is best to check Use and Care manual, available on line at www.hamiltonbeach.com. Never use your dishwasher’s Sani Cycle, it heats to extremely high temperatures and may damage even dishwasher safe parts.
- Are containers and cutting units dishwasher safe?
The glass jar is top rack dishwasher safe. Dishwasher use may, however, cause the plastic container to "cloud." This is normal.
The cutting unit is not dishwasher safe and should be washed with hot soapy water.
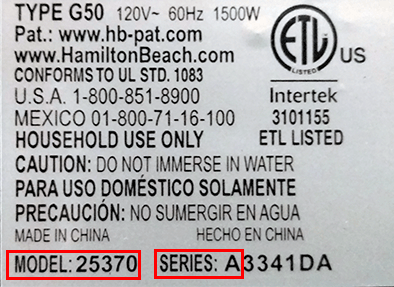
Helpful Hint: While the container is dishwasher safe, for best long-term use and care you should hand wash and dry it. - Where’s the model, type and series number located?
Model number, type number, series code and wattage information is located on the rating label. The rating label is located on the bottom or rear of your blender motor housing. It may be found on a sticker or engraved into the plastic.
- How do I determine the watts?
The watts are determined by multiplying the amps by the volts.
- What parts are replaceable?
Jar, lid and filler cap.
- Why doesn't my bread maker turn on?
Verify that the appliance is connected to a working outlet. Consider trying a different outlet and ensure the circuit breaker isn't tripped. For further support, contact the Hamilton Beach customer service team at hamiltonbeach.com/customer-service.
- Why isn't my dough rising?
Several factors can affect dough rise, with active yeast being among the most crucial. To ensure your yeast is active and not expired, follow these steps:
- Pour 1 cup (240 g) of warm water between 105°-115°F into a measuring cup.
- Add 1 teaspoon (5 g) of white sugar and 1 tablespoon (11 g) of yeast.
- Place the measuring cup in a warm place for approximately 5 minutes.
- Active yeast will visibly bubble or expand. If there's no reaction, the yeast may be inactive or expired.
Storing yeast in the refrigerator or freezer is recommended to extend its shelf life.
- Why is the dough rising too high?
Here are some simple tips to prevent your dough from rising too much:
- Carefully measure all ingredients, including yeast. Too much yeast can make the yeast rise too high.
- Check the flour's expiration date.
- Minimize lid lifting during cycles to maintain the ideal temperature.
- Verify that the kneading paddle is correctly positioned in the pan.
- Try reducing yeast quantity by 1/4 teaspoon (1g).
- Can I make gluten-free bread in a bread maker?
Yes, Hamilton Beach Bread Makers are great for making gluten-free bread. For optimal results, ensure you're using the correct program and the right type of gluten-free flour.
More information on gluten-free flours:
All-purpose flour: This has a mix of hard and soft wheat, perfect for general baking.
Bread flour: Bread flour is better suited for yeast breads. Bread flour is the key ingredient in making bread and is recommended for most yeast-bread recipes due to its high gluten content that helps the bread keep its shape after rising. Flour varies by region. For example, American flour is milled from hard spring wheat; Canadian flour is milled from hard winter wheat.
Self-rising flour: Contains baking powder, mainly used for making cakes. Do not use self-rising flour with yeast.
Whole-wheat flour: Ground from the entire wheat kernel, it adds more fiber and nutrition content to your bread. Whole-wheat flour is heavier. As a result, loaves may be smaller in size and have a heavier texture.
All-purpose gluten-free flour: Used for gluten-free recipes. A 1:1 replacement gluten-free flour mix works as a substitute for regular flour in non-gluten-free recipes. Use an equal amount of the 1:1 replacement mix as you would regular flour.
NOTE: 1:1 replacement gluten-free flour will not work with yeast bread recipes.
- Can I make sourdough in the bread maker?
Yes, sourdough bread can be made in our bread makers. Use the sourdough setting and a sourdough starter for the best results. If your bread maker doesn't have a sourdough setting, the French bread cycle can also be used to achieve similar results. Sourdough, like French bread, requires long rise cycles.
- How do I add nuts or seeds to the bread?
Some of our bread maker models have an automatic nut and seed dispenser. If your model includes this feature, place the nuts or seeds into the designated compartment and activate the "dispense/distribute" function. The bread maker will add the nuts automatically. For models without the automatic dispenser, there may be an audible tone (beep) that signals the beginning of the second knead. When this occurs, pause the bread maker, add nuts or seeds, close the lid, and resume the cycle.
- Why is my bread crust soggy?
To prevent a soggy crust, remove the bread pan promptly from the bread maker once the baking cycle is complete.
- How do I remove the kneading paddle from the loaf?
The paddle is designed to come out of the pan along with the bread. Use the paddle removal tool to gently hook and pull the paddle out from the loaf.
- How do I remove the kneading paddle from the bread pan?
To remove the paddle, add water to the bread pan and let it soak for 15 minutes. If the paddle does not come loose, contact our customer service for assistance at https://hamiltonbeach.com/customer-service
- What program functions does the bread maker have?
Please see the Use and Care Guides for details about each model: https://hamiltonbeach.com/use-and-care
- What is the capacity of the bread maker?
Please see the Use and Care Guides for details about each model: https://hamiltonbeach.com/use-and-care
- Can I customize the baking cycle?
Certain Hamilton Beach bread maker models offer customization options for kneading, rising, and baking times and temperatures. Please see the Use and Care Guides for details about each model: https://hamiltonbeach.com/use-and-care
- What flour should I use in the bread maker?
All-purpose flour: This has a mix of hard and soft wheat, perfect for general baking.
Bread flour: Bread flour is better suited for yeast breads. Bread flour is the key ingredient in making bread and is recommended for most yeast-bread recipes due to its high gluten content that helps the bread keep its shape after rising. Flour varies by region. For example, American flour is milled from hard spring wheat; Canadian flour is milled from hard winter wheat.
Self-rising flour: Contains baking powder, mainly used for making cakes. Do not use self-rising flour with yeast.
Whole-wheat flour: Ground from the entire wheat kernel, it adds more fiber and nutrition content to your bread. Whole-wheat flour is heavier. As a result, loaves may be smaller in size and have a heavier texture.
All-purpose gluten-free flour: Used for gluten-free recipes. A 1:1 replacement gluten-free flour mix works as a substitute for regular flour in non-gluten-free recipes. Use an equal amount of the 1:1 replacement mix as you would regular flour.
NOTE: 1:1 replacement gluten-free flour will not work with yeast bread recipes.
- How do I know if yeast is still fresh/active?
To test the freshness of your yeast:
- Pour 1 cup (240 g) of warm water (between 105°-115° F) into a measuring cup.
- Add 1 teaspoon (5 g) of white sugar and 1 tablespoon (11 g) of yeast.
- Let it sit in a warm spot for around 5 minutes.
- Active yeast will start bubbling or expanding. If not, the yeast is inactive or expired.
- Can I use a sugar substitute?
Sugar is necessary for yeast to produce a light loaf with a good height. Natural sugar, such as honey, agave, or maple syrup will work, although results will vary with the type and amount used. Erythritol, stevia, and artificial sugar substitutes will not allow the yeast to ferment and should be avoided.
- Can I omit salt or sugar from the recipe?
The combination of sugar, salt, and yeast is essential in bread-making. Salt regulates yeast activity, preventing excessive rising.
Note: Sugar and salt are distributed among slices, so each serving contains only a small amount.
- Can I open the lid while bread maker is operating?
This bread maker features a viewing window in the lid, allowing you to monitor the progress. Quick checks during initial kneading are okay. Avoid opening the lid during the rising and baking stages to prevent potential issues like the loaf falling or improper baking due to temperature adjustments in the baking chamber. Condensation may form on the viewing window after mixing and kneading, but it typically clears once the baking cycle begins, providing a clear view of your loaf.
- Can I use my favorite bread recipes in my bread maker?
Some recipes have a bread maker conversion guide, but if not, experiment to find the right proportions. Make a few loaves and use Hamilton Beach recipes to determine the ratio of ingredients. Never exceed the dry ingredient capacity of your bread maker.
- What will happen if I leave bread in the bread pan after baking?
Some models have a warm cycle that lets you leave bread in the bread maker for up to an hour after baking is complete. However, your bread may continue to cook or brown slightly. Once the warming cycle is over, it is best to remove the bread pan immediately and let it cool for 10 minutes before removing the bread from the bread pan.
- Can recipes be cut in half?
No, it is not recommended. The ingredient proportions perform better when used in the full amounts.
- Can I use a bread mix in a bread maker?
Many packages have bread maker instructions. The instructions on the package will list the required amount of water and yeast. Be sure to add liquid, then dry ingredients, followed by yeast. Do not allow the yeast to sit in liquid.
The bread type setting varies based on the bread mix:
- Basic cycle for white bread
- Sweet bread cycle for additions like dried fruit, cheese, or nuts
- Whole Grain setting for whole-wheat or multigrain
Do not use bread mixes that exceed 2 lb. (907 g) loaf size.
- Why is the window cloudy or covered with condensation?
Condensation may occur during mixing or rising cycles but usually disappears during baking. Clean window well in between uses.
- Why is the dough not blending thoroughly?
If you're facing issues with dough blending or excess flour buildup:
- Ensure the bread pan is securely set in the unit and the kneading paddle is firmly on the shaft.
- Make sure ingredients are measured accurately and added in the proper order.
- Consider pausing the bread maker afte``r the first mixing cycle to scrape the sides with a rubber spatula to ensure all ingredients are blended.
- Gluten-free dough tends to be wet; pause the cycle if needed and use a spatula to blend ingredients.
- Excess flour can be removed from loaf once baked and cooled. After baking and cooling, gradually add water (one tablespoon at a time) until the dough forms a ball, removing the excess flour.
- Why does bread have a crater on top of the loaf once baked?
The dough has risen too fast because too much yeast or water was added. To correct this, measure all ingredients accurately and decrease the amount of yeast or water slightly, if necessary. Ensure the correct cycle is used for your recipe.
- Why is the crust color too light?
If the crust color is too light, limit opening the lid, especially once the initial kneading cycle starts. This prevents temperature drops that might hinder proper baking. You can also try selecting a darker crust option (not available on all cycles) to adjust the baking process for a deeper color.
- Why is the crust color too dark?
If the crust color is too dark, consider slightly reducing the amount of sugar. You can also try selecting the light crust option (only available on some cycles).
- Why is the bread loaf lopsided?
A lopsided loaf might be caused by:
- Using too much yeast or water. Measure accurately and reduce yeast or water slightly if needed.
- The kneading paddle pushing dough to one side before baking.
- Whole-grain flour can sometimes result in an uneven loaf.
- Why are the loaves different shapes?
Bread shape varies by the type of bread. Whole-grain or multigrain bread tends to be denser and might appear shorter compared to basic white bread.
- Why is bread hollow or holey inside?
Bread will vary due to ingredients and environmental factors like room temperature, humidity, and altitude. To avoid uneven rising or holes in the bread:
- Measure ingredients accurately.
- If the dough is too wet or rises unevenly, reduce yeast or water slightly and check salt measurement.
- Use warm, not hot, water when adding it to the pan to prevent issues.
- Why is bread underbaked or sticky?
Using too much water or selecting the wrong cycle (with incorrect bake time) can cause underbaked or sticky bread. To fix this:
- Reduce the amount of liquid used.
- Ensure precise measurement of ingredients.
- Double-check the chosen cycle for the recipe.
- Why does the bread mash down when I slice it?
The bread may be too hot. Allow the bread to cool on a wire rack before slicing. For best results, allow the bread to cool for 20-30 minutes after removing it from the bread maker.
- Why does bread have a heavy, thick texture?
This can happen due to excess flour, old flour, or insufficient water. Try adding more water or reducing the amount of flour used. Additionally, remember that whole-grain breads or those with many add-ins like dried fruits and nuts often have a denser texture.
- Why is the outside of the pan dark or spotted?
If the outside of the pan appears dark or spotted, it might be from washing in the dishwasher. This is normal and won't impact the bread pan's performance.
- How do I prevent the bread from breaking when removing it from the pan?
Allow bread to cool for 10-15 minutes before removing it from the bread pan to prevent it from breaking apart.
- How do you remove the cutting assembly for cleaning?
Raise the lever to its highest point and push the lever to the right or left (depending on your model) until it pops out of its locked position.
- How do you remove the under-the-cabinet can opener from the mounting bracket? And where are the screws located?
Raise the center tab up and slide the can opener to the rear. The screws are located inside the top of the unit along with the cord. This is also the cord storage.
- Why are the screws so long?
Households have a variety of cabinet styles. Longer screws allow the unit to be placed in the great majority of these households.
- Why does the cutting assembly drop the can?
The most likely explanation for this is that the can is not being positioned correctly. The can should be placed under the can guide arm with the lid between the drive gear and blade.
- Should you be able to open large coffee cans?
Yes. The can should be held, particularly if you have a short can opener. Opener may have to be held over the side of the counter.
- Should you be able to see the blade pierce the can?
Yes. When the can starts turning.
- Why doesn't the blade pierce the can?
It probably does but, because the unit has an automatic shutoff feature, the blade does not pierce the can until the lever is depressed to activate the cutting operation.
- Does the blade retract?
Yes
- How do you replace the cutting assembly afer cleaning?
Place knob on back of lever into large end of keyhole, then push left or right (depending on your model) until it stops.
- How do you use the Penguin® can opener?
To open a can, push front of cutting assembly backwards to lift the blade. Make sure the flip-up magnet is in the up position. Tilt top of can in to position cutting blade inside rim of can. Push down top of cutting assembly to start the cutting action. To remove the can, hold the can and push backwards on front of cutting assembly again. To remove the cutting assembly for washing, twist release button on front of can opener clockwise and lift out cutting assembly. Wash, rinse, and dry thoroughly. If you want to wash the cutting assembly in the dishwasher, remove flip-up magnet first by grasping one side near hinge and pulling out slightly until magnet releases from hinge. To replace cutting assembly, place it in position and firmly press both sides until it snaps into place.
- Single-Serve The Scoop®: How do I get the best cup of coffee from my The Scoop® Coffee maker?
In order to get a great tasting cup of coffee: Scoop coffee grounds directly into the The Scoop® filter provided. For an 8oz. cup, scoop grounds to the first line mark in your scoop filter. For up to a 14oz. cup, scoop grounds to the 2nd line mark (MAX) in your scoop filter.
If you prefer to use a traditional coffee scoop method to get started, measure coffee in the following way:8-oz. cup = 2 tablespoons ground coffee
14-oz. cup = 3 tablespoons ground coffee
To get the perfect taste you prefer, adjust measurements up or down accordingly.
Please refer to your full Use and Care Guide for warnings, additional instructions, tips, and guidance on how to use this product. - Use: The safeguards in the Use & Care manual state to unplug the coffee maker after use. Is this really necessary?
Yes. You should unplug all countertop electric appliances when finished using. Unplugging the unit will disable the clock; however, it is not intended to be the principal time keeping device in the home.
- Use: Why do I not get 12 actual cups from my 12-cup coffee maker?
The standard serving size for coffee is 5 ounces, not the 8 ounce cooking unit of measurement for volume.
- Use: What is the best temperature for brewed coffee?
175°-185°F is the standard brew and keep-warm temperature for coffee.
- Use: Why is my coffee maker overflowing?
If water is overflowing, the water reservoir is overfilled. There is a drain hole in the rear of the coffeemaker to prevent overfilling. If the overflow is coffee, you may have used more than one tablespoon of coffee per cup of water or not fully seated either the brew basket and/or the carafe underneath the brew basket. Make sure you have correctly aligned the brew basket and the carafe and are using the correct amount of coffee grounds. Overflowing may happen more frequently with decaffeinated, flavored and finely-ground coffee. Overflowing may occur if the paper filter collapses inside the brew basket. Use a good quality paper filter.
- Use: Can I reheat cold coffee?
The warming plate is not designed to reheat cold coffee.
*Tip: The best way to reheat cold coffee is in a mug in a microwave. Do not pour cold coffee back through the coffeemaker’s water reservoir – it will cause a blockage within the element and damage the coffeemaker. - Use: Can I put the carafe on a stovetop or in the microwave?
No. Never place the carafe on a stovetop or in the microwave.
- Use: Why is my coffee maker noisy?
It is normal for a coffee maker to produce gurgling and boiling sounds near the end of the brew cycle as the last of the water cycles. This sound may also be heard anytime the unit is turned off and back on.
- Use: Can I turn my coffee maker off and then back on to keep the 2 hour automatic shut off from activating?
Yes. However, if there is water in the reservoir, the coffee maker will begin a new brew cycle.
- Features: What makes the 1-4 cup mode different from other modes?
The 1-4 cup mode slows the brewing process in order to get the full flavor of the coffee without having to use more coffee grounds.
- Features: What is Accelerated Brewing?
Coffee makers that feature “Accelerated Brewing” have higher wattage, and therefore will brew faster.
- Features: What does the water drop on the display mean?
The water filter needs to be replaced.
- Features: What does the Brew Selector feature do?
The Brew Selector allows you to select the strength of your coffee. When using the Bold or Robust setting, hot water is dispensed more slowly over the grounds, allowing more coffee flavor to be extracted from the coffee grounds. The Bold setting will take a few minutes longer to finish brewing than the standard brew setting.
- Model Information: Where can I find the model, type and series number of my coffee maker?
Model number, type number, series number, and wattage information are located on the rating label, which is on the bottom or rear of your coffee maker. It may be a sticker or engraved into the plastic.
- Model Information: How do I determine the wattage?
Watts are determined by multiplying the amps by the volts.
- Model Information: How do I determine the amps?
The amps are determined by dividing the volts into the watts. Example: volts = 120, watts = 1000. Therefore, 1000 divided by 120 = 8.3 amps.
- Model Information: What parts are replaceable?
Tank, lid, filter, basket filter, water filter, seal and descaler.
- Clean: What is the best way to clean the inside of my Automatic Drip Coffee maker?
- Place empty carafe on Keep-Hot Plate and place empty filter basket into coffee maker. Firmly close rotating filter cover.
- Pour one pint of plain white vinegar (or coffee maker cleaner and descaler) into the reservoir.
- Turn ON coffee maker.
- After 30 seconds turn OFF.
- Wait 30 minutes to allow the vinegar to clean. Then turn ON again. When the brew cycle is finished, turn OFF.
- Empty carafe and rinse. Pour one carafe of cold water into the reservoir. Place carafe on Keep-Hot Plate
- Turn ON. When the brew cycle is finished, empty the carafe. Repeat this process with one more carafe of cold tap water.
- Turn OFF when complete.
- Wash carafe and filter basket before making a beverage.
Refer to your Use & Care guide for tips specific to your coffee maker.
- Clean: How should I clean coffee stains in my stainless steel thermal carafe?
Fill the stainless steel thermal carafe with boiling water and add a dishwasher tablet. Let it sit overnight, then rinse thoroughly the next day.
- Clean: How often should I clean my Automatic Drip Coffeemaker?
Cleaning prolongs the life of the coffeemaker. We suggest that those coffeemakers that are used daily be cleaned monthly.
- Clean: Are any of the parts dishwasher-safe?
Our glass and stainless coffee maker carafes are top-rack dishwasher safe as are the brew baskets, pod baskets and brew baskets, but always check the Use and Care guide for detailed cleaning instructions.
- Parts: Where can I purchase replacement parts?
Replacement parts are available at some local discount and department stores; otherwise, carafes, replacement water filters, etc. can be purchased directly through our website and toll-free Consumer Service Line (800.851.8900) or from a Master Parts Distributor.
- Parts: Can I purchase a heating element or any internal part?
No. We do not intend for coffee makers to be repaired. Internal parts are not sold to consumers.
- BrewStation: My BrewStation does not seem to be pumping the water through, or it may start and stop. How can I fix this problem?
Clean the unit with a decalcifier (like CLR), according to the instructions in your Use & Care guide (available online). Most of the time, decalcification will correct the problem because the unit may just be clogged.
- BrewStation: My BrewStation has started to dispense coffee more slowly than usual. How can I fix this?
You may have a clogged screen in the bottom of the brew tank. Try using an old toothbrush to gently clean the mesh screen and rinse away the buildup.
- BrewStation: Why is my BrewStation tank leaking?
You may have buildup in the tank seal. Turn the brew tank upside down over the kitchen sink, then press the dispensing valve (on the bottom of the tank) and flush with water for 30 seconds.
- Features: What does the star on the clock display mean?
The unit needs to be cleaned. Use a decalcifier as instructed in the Use & Care guide (available online).
- My BrewStation does not seem to be pumping the water through, or it may start and stop. How can I fix this problem?
Clean the unit with a decalcifier (like CLR), according to the instructions in your Use & Care guide (available online). Most of the time, decalcification will correct the problem because the unit may just be clogged.
- My BrewStation has started to dispense coffee more slowly than usual. How can I fix this?
You may have a clogged screen in the bottom of the brew tank. Try using an old toothbrush to gently clean the mesh screen and rinse away the buildup.
- Why is my BrewStation tank leaking?
You may have buildup in the tank seal. Turn the brew tank upside down over the kitchen sink, then press the dispensing valve (on the bottom of the tank) and flush with water for 30 seconds.
- Why will my FlexBrew® Coffee Maker not brew?
There may be two reasons your FlexBrew® Coffee Maker is not brewing:
- If the brew button is pressed, the FlexBrew® takes about 3 minutes to warm up and complete a full cycle.
- The bottom needle of the single serve holder may be clogged- see “Unclogging Needle” under the Care & Cleaning section.
- Why does my coffee taste bad?
If your coffee isn’t tasting up to par, your FlexBrew® may need to be cleaned— see “Descaling/Deep Cleaning” under the Care & Cleaning section.
If the problem persists, your coffee may be too coarsely or too finely ground. You can also try using filtered water, which provides a better-tasting cup of coffee than tap water.
- Why are there coffee grounds in my cup?
If your coffee isn’t tasting up to par, your FlexBrew® may need to be cleaned— see “Descaling/Deep Cleaning” under the Care & Cleaning section.
If the problem persists, your coffee may be too coarsely or too finely ground. You can also try using filtered water, which provides a better-tasting cup of coffee than tap water.
- Coffee overflows from brew basket.
There are a few ways you can prevent your coffee from overflowing:
- Don’t use more than three tablespoons of coffee or beans that are too finely ground.
- Use a removable brew basket with a lid for ground coffee.
- If the black seal around the needle is missing, carefully place the seal back around needle and push until in place.
- Rinse and align your funnel after each use.
- Coffee single-serve pod bursts.
If your pod bursts, you may need to try a different, higher-quality brand. Some single-serve pods are weaker at the seams, causing the foil seal to break.
- General Cleaning
All coffee makers should be cleaned at least once a month or once a week for areas with hard water.
- Unplug and allow to cool.
- Hand-wash all removable parts in hot, soapy water. Or wash on TOP RACK of dishwasher. DO NOT use “SANI” setting when washing in dishwasher, because it could damage the product.
- Wipe outside of coffee maker with a soft damp cloth.
- Plug into outlet.
- Descaling/Deep Cleaning
Watch our video for more information on the routine care and cleaning of your FlexBrew coffee maker.
- Pour 14 oz. (414 ml) of plain white vinegar into water reservoir.
- Place a 14-oz. (414-ml) or larger cup or travel mug underneath to catch vinegar. Select 14oz travel mug . Press BREW REG or BREW BOLD button once. When solution starts dispensing, press BREW REG or BREW BOLD button again to stop brewing and allow vinegar to clean. After 30 minutes, press BREW REG or BREW BOLD button and allow it to finish brew cycle. When brew cycle is finished, empty cup and rinse.
- Run 2 to 3 14oz cycles of cold tap water. The unit is cleaned and ready to brew coffee.
- Unclogging Needle
Watch our video to find out how to unclog and clean the needle on your FlexBrew coffee maker.
- Unplug coffee maker and allow to cool.
- Remove gray removable needle holder in lid by turning arrow from locked icon (
 ) to the unlocked icon(
 ).
). - Bend a small paper clip. Insert tip of paper clip through hole of the piercing needle and up into shaft of piercing needle to ensure grounds have been removed. Rinse.
- To replace removable needle holder, insert tab between lock icon()and unlock icon () and turn to right to lock.
- How to Purge / Clear Water from Unit
- Place 14-oz. (414-ml) mug or larger on travel cup rest.
- Press either BREW REG or BREW BOLD button and hold for 3 seconds to empty all water from coffee maker. White brew indicator light will flash during purging. Light will turn off when purging is complete.
- All Lights Flashing
- Place 14-oz. (414-ml) mug or larger on travel cup rest.
- Press either BREW REG or BREW BOLD button and hold for 3 seconds to empty all water from coffee maker. White brew indicator light will flash during purging. Light will turn off when purging is complete.
- No power
- Check that plug has been inserted correctly into outlet and that Power Switch, located on right side panel, is in ON (I) position.
- Coffee Maker is in power-saving mode. Press any cup size button to wake up Coffee Maker.
- All cup lights are slowly fading in and out
- Unit is in preheating mode. When lights stay on, Coffee Maker is ready to brew
- Espresso is not dispensing
- Pod inserted may be faulty. Try again with a new pod.
- All lights are flashing quickly: There is no water in Water Reservoir. Fill with clean cold water.
- Unit is preheating. Lights will slowly fade in and out during preheating. Once preheating is finished, all lights will stay on and you can press desired cup size button to begin brew cycle.
- There is water at bottom of machine
- Make sure that Water Reservoir has been placed correctly into position.
- Make sure that the Used Pod Container is installed before opening Espresso Lid.
- It is normal for a small amount of water to drip into the Pod Container.
- Pod cannot be placed into Pod Holder
- Check if Used Pod Container is full and needs to be emptied.
- Espresso Lid may not have opened correctly. Try lifting Espresso Lid again.
- Pod cannot drop into Used Pod Container normally
- Used Pod Container is full and needs to be emptied.
- Espresso Lid may not have opened correctly. Try lifting Espresso Lid again.
- A slight hiss can be heard after espresso has been dispensed
- This is a function of Coffee Maker which is normal.
- Espresso drips from espresso dispenser after brewing is completed
- It is normal that some liquid will fall or drip out of the Espresso Dispenser at end of the brew.
- Keep cup on Cup Rest until Espresso Lid has been opened and dripping stops.
- All Cup Lights are Quickly Flashing
- Ensure red plug has been removed from beneath the Water Reservoir before first use.
- Water Reservoir is empty or not securely in place. If empty, fill Removable Water Reservoir with water up to 56 oz. (1656 mL). Do not exceed MAX fill line, and never let water tank get below MIN fill line. It is normal for a small amount of water to drip into the Used Pod Container.
- If you have added water to the Water Reservoir and lights are still quickly flashing, press the desired cup selection again. Button may need to be pressed a few times to prime the water pump if the Water Reservoir has been run dry. If lights still continue to flash, discard pod and insert a new pod.
- Coffee Maker needs to be descaled.
- Espresso Lid is not closed. Close Espresso lid.
- Coffee Maker will not brew/coffee not dispensing
- Piercing Needle may be clogged.
- Mineral deposits have formed. Clean Coffee Maker following directions in Care and Cleaning section.
- Too little water. Need 15 oz. (444 mL) or more.
- If selected cup button flashes three times, Lid is not closed. Lower Lid until it clicks to lock and press desired brew button.
- Coffee tastes bad
- Too much water was added or too much or too little ground coffee was added. Change ratio of water to coffee grounds or use less water with coffee pods.
- Poor coffee quality and freshness.
- Soft water causes poor coffee extraction which leads to poor tasting coffee. Use filtered, spring or bottled water if your water is soft.
- Coffee sediment in cup
- Try a coarser grind of coffee, or add a #1 paper cone coffee filter to Brown Removable Brew Basket. Make sure hinged Lid is closed on Brown Removable Brew Basket.
- Water on counter under unit
- Overfilled Water Reservoir. Do not add more than 56 oz. (1656 mL) of water (up to MAX fill line).
- Make sure that Removable Water Reservoir has been placed correctly into position.
- Coffee overflows from Brew Basket
- Use Brown Removable Brew Basket with Lid for ground coffee.
- Use a lesser amount of ground coffee. 3 tablespoons (15 g) is maximum amount of grounds to brew.
- When using whole bean coffee, a standard automatic drip coffee grind will yield best results. Be careful not to overgrind, since very finely ground coffee can cause overflow.
- Black Seal around Needle in Removable Needle Holder is missing. Carefully place seal around Needle and push into place.
- Do not use soft water. Use filtered, spring or bottled water.
- Coffee overflows from travel mug or regular mug
- Empty mug after manually stopping brew cycle. Press any cup size button to start a new brewing cycle.
- Coffee single-serve pod bursts
- If you are using softened water or live in an area where your tap water is naturally soft, this can cause single-serve pod issues and filter basket overflows. Use filtered, spring or bottled water.
- There is variability in single-serve pod manufacturing process which causes some types of single-serve pods to be weaker at seams so foil seal fails. Try a different brand.
- All Cup Lights are Quickly Flashing
- Ensure red plug has been removed from beneath the Water Reservoir before first use.
- Water Reservoir is empty or not securely in place. If empty, fill Removable Water Reservoir with water up to 56 oz. (1656 mL). Do not exceed MAX fill line, and never let water tank get below MIN fill line. It is normal for a small amount of water to drip into the Used Pod Container.
- If you have added water to the Water Reservoir and lights are still quickly flashing, press the desired cup selection again. Button may need to be pressed a few times to prime the water pump if the Water Reservoir has been run dry. If lights still continue to flash, discard pod and insert a new pod.
- Coffee Maker needs to be descaled.
- FlexBrew Lid is not closed. Close FlexBrew lid.
- Why can’t I turn on my coffee maker via the app or Echo device?
Check to see whether the ‘Ready to Brew’ light is on. Typically, this will resolve the issue. The ‘Ready to Brew’ button and light must be activated to use your Alexa App or voice commands and prevents the coffee maker from accidentally being turned on.
*Remember to press ‘Ready to Brew’ each time you fill the coffee maker with water and coffee grounds.
- Does this coffee maker automatically shut-off?
Yes, the coffee maker automatically turns off after 2 hrs.
- What does a CLEAN message mean?
‘CLEAN’ scrolls across the display when the coffee maker requires cleaning. Performing the recommended cleaning will make this message disappear.
- Unplug the coffee maker and wipe the appliance with a damp cloth or sponge. Dry afterwards.
- If there is a water filter, remove the water filter and water filter base.
- Pour a minimum of 1 pint or 2 cups of white vinegar into the water reservoir.
- Press the ON/OFF (|/O) button. After 30 seconds, turn off (O). Wait 30 minutes to allow the vinegar to clean. Then, press ON/OFF (|/O) button to turn ON (|) again. When the brew cycle is finished, wait for the coffee maker to cool.
- Empty and rinse the carafe.
- Brew a full carafe of clean water for 2 additional cycles to rinse the heater, allowing 15 minutes to cool between cycles.
- How do I change brew strength?
This coffee maker has a special feature that allows you to program a regular or bold cup of coffee. To change brew strength, click the brew strength button on the unit, visit your Alexa app or tell your Echo device ‘Alexa, set brew strength to regular’ or ‘Alexa, set brew strength to bold’
- What routers are supported?
This coffee maker supports routers with WEP, WPA, WPA2 802.11 b/g/n 2.4 GHz. Unfortunately, it does not connect with 5 GHz networks. If you are trying to connect to a 2.4 GHz network and still cannot connect, please try moving the appliance closer to your home router.
- How do I erase my Wi-Fi Information?
From the appliance, press and hold the Wi-Fi button for 10 seconds. The Wi-Fi light will flash blue for 10 seconds, then will remain red for 2 seconds when Wi-Fi credentials are erased. You may also remove your credentials by clicking the trash can icon under Settings in the Alexa App.
- Where can I find the privacy policy and terms of usage?
- How do I get the best cup of coffee from The Scoop® Coffee Maker?
In order to get a great tasting cup of coffee: Scoop coffee grounds directly into The Scoop® filter provided. For an 8oz. cup, scoop grounds to the first line mark in your scoop filter. For up to a 14oz. cup, scoop grounds to the 2nd line mark (MAX) in your scoop filter.
If you prefer to use a traditional coffee scoop method to get started, measure coffee in the following way:8-oz. cup = 2 tablespoons ground coffee
14-oz. cup = 3 tablespoons ground coffee
To get the perfect taste you prefer, adjust measurements up or down accordingly.
Please refer to your full Use and Care Guide for warnings, additional instructions, tips, and guidance on how to use this product.
- How do I clean The Scoop® Coffee Maker?
All coffee makers should be cleaned at least once a month (once a week for areas with hard water).
Pour 1/2 cup (125 ml) of plain white vinegar and 1/2 cup (125 ml) of cold water into reservoir.
Place cup on the cup rest.
Press the REGULAR or BOLD button once. After 30 seconds, turn unit OFF (O) using the REGULAR or BOLD button and allow the vinegar to clean. After 30 minutes, plug in the coffee maker and allow it to finish the brew cycle When the brew cycle is finished, wait for the coffee maker to cool. Empty your cup and rinse it.
Place your cup on the cup rest again, and run two to three cycles of cold tap water through the coffee maker. The Scoop is now cleaned and ready to make coffee.
You can wipe the exterior with a soft, damp cloth to keep the stainless finish clean.
Make sure to discard your coffee grounds after each use. Rinse and and clean The Scoop's brew basket with soapy water. Towel dry or hang the scoop to dry on the brew basket holder.
NOTE: The Scoop brew basket should be cleaned daily, and the filter holder should be cleaned at least once per week.
DISHWASHER SAFE: The Scoop brew basket, the cup rest, the filter holder, and the filter well are all top-rack dishwasher safe. Never immerse the cord, plug, or coffee maker in any liquid.
Please refer to your full Use and Care Guide for warnings, additional instructions, tips, and guidance on how to use this product.
- How do I use the Regular and Bold Settings on The Scoop® Coffee Maker?
Use the BOLD setting when you want a stronger cup of coffee. It is also ideal for flavored, decaf, finely ground, and premium brand ground coffees.
Press REGULAR or BOLD to start the flow of coffee. The coffee maker will automatically turn off when brewing is complete.
- How do I stop The Scoop® Coffee Maker from brewing?
The Scoop coffee maker will automatically turn off when brewing is complete.
If you need to stop brewing mid-cycle, press either the REGULAR or BOLD button, and the coffee maker will turn off.
- Why will The Scoop® Coffee Maker not brew?
If there is no water in the water reservoir, and a brew button is pushed, the unit will not brew. The LED light will blink for 5 seconds, then the coffee maker will turn off (O).
- Why does my coffee taste bad?
The coffee maker may need to be cleaned— see the "How do I clean The Scoop Coffee Maker" section or reference your Use and Care.
The coffee grounds used may be too coarsely or too finely ground resulting in a too weak or too strong cup of coffee. If grinding your own grounds, be sure to set your coffee grinder to "automatic drip grind".
There may be an issue with the quality or freshness of the coffee used.
Ground coffee will become stale much faster than whole beans. If you are buying pre-ground coffee, choose a package with the latest expiration date or a smaller amount of coffee.
Try to use freshly ground coffee within about a week of grinding.
All coffees are made from either arabica beans or robusta beans, or a combination of both. Arabica beans are slightly more expensive but tend to produce better-tasting coffee.
There may be an issue with the quality of water used to brew your coffee.
Using a water filter, filtered water, or bottled water will result in better-tasting coffee than tap water.
- Why is there water on the counter under my The Scoop® Coffee Maker?
It's possible the water reservoir was overfilled.
Also, some mugs or cups do not pour well, so water can dribble down the side of the cup and onto the counter.
- Why is my coffee weak?
If your coffee is too weak, try brewing using the BOLD setting or adjusting the water/coffee ratio by using slightly less water and/or slightly more grounds (be careful not to exceed the MAX line for grounds though).
- Why is coffee overflowing from The Scoop® Coffee Maker's brew basket?
Too much coffee may have been used— be sure to not exceed the MAX line for coffee grounds as indicated on the brew basket. Try using less coffee grounds during the next brewing cycle.
Be sure to use the BOLD setting for flavored, finely ground, premium brand ground coffees, and decaf coffees to prevent overflow.
When grinding your own coffee from whole beans, a standard automatic drip coffee grind will result in the best coffee. Be careful not to overgrind, since very finely ground coffee can cause The Scoop to overflow.
- Why is coffee overflowing my coffee cup or travel mug?
To prevent coffee from overflowing your coffee cup or travel mug, be sure to use the same cup you used to fill the water reservoir is used to brew coffee into.
- How can I get my spindle to stay in?
Insert the spindle up into the motor head, with a twisting motion. This will allow the notch on the spindle and gear inside the motor to connect.
- How long does it take to boil water?
This depends on the kettle (size 1L vs. 1.7L and heater rating), starting water temperature, water amount, and altitude.
- How long does it take for my kettle to cut off after water begins to boil?
30-90 seconds depending on water level. Note Kettle lid and screen must be properly secured in place.
- Does the Kettle get hot to the touch?
Yes, but the handle remains cool to the touch.
- Are Kettles BPA free?
Yes, all materials in content with boiling water are BPA free.
- Why isn’t the kettle shutting off?
Is the kettle lid completely closed? The lid must be closed firmly with the mesh filter (at spout) in place in order for the kettle to turn off automatically.
Is the kettle filled to greater than or equal to minimum water level? The kettle may not shut off automatically if not filled to the minimum water level
Note it can take 30-90 seconds to shut off after boiling begins depending on water level
- Why is there a mesh filter at the pouring spout?
This must be in place for the kettle to properly operate. The second purpose is to minimize suspended particles (mineral scale) from being poured out of the kettle. Scale is caused by lime and calcium in hard water.
- Which models offer variable temperature control, 160-212°F?
Hamilton Beach offers several kettles with variable temperature control. Please visit our Electric Kettle offerings and look for units with "variable temperature", "temperature control", or "digital" listed in the product features.
- How are they cordless?
Some kettles lift off a power base for cordless pouring. Others offer a detachable cord that easily removes from the back of the kettle so you are free to take the kettle to the table for serving
- What is the best way to clean stains from my kettle?
To remove scale/lime deposit from the kettle floor: Place 1 tablespoon of white vinegar into the kettle. Then let sit for 10 minutes. Wipe the floor of the kettle with a paper towel. Finally, rinse several times with clean tap water.
It is normal for stainless steel heating elements to discolor. This does not affect the performance of the kettle. Do not use abrasive scouring pads or cleaners since this may damage the stainless steel surface.
- How does a kettle work?
It depends. There are two different styles. 1) Auto Shut off; Steam builds inside kettle from heating the water and turns off kettle. 2) Variable Temperature; Operates based on the temperature of the water with a sensor. All models offer boil dry protection with auto shut off.
- What is the material of the vessel?
Depends on the model. Common materials are Stainless Steel, Glass, and Plastic. All kettles are BPA free in boil zones.
- Why can’t I turn on my kettle via the app or Echo device?
Check to see if the light around Wi-Fi button on kettle base is blue. If the light is red, remote commands have not been enabled.
*Remember to fill water to minimum water level in kettle before turning on.
- Does this kettle automatically shut-off?
Yes, the kettle automatically turns off after the keep warm time expires.
- My kettle is connected to Alexa but is not heating properly
- Kettle does not have enough water in it
- Remove kettle from base and fill with water to at least minimal water level.
- Place kettle back on base and try starting again.
- Kettle body is removed from base
- Kettle will not start without kettle body on base.
- Place kettle back on base and try starting again.
- Vacation Protection has been tripped
- If 4 heating cycles over 1 day or 2 heating cycles over 2 days have been completed without the kettle being lifted from the power base, kettle will not start until kettle body has been removed and placed back on base
- Remove kettle body from base
- Place kettle back on base
- Kettle does not have enough water in it
- What routers are supported?
This appliance supports routers with WEP, WPA, WPA2 802.11 b/g/n 2.4 GHz. Unfortunately, it does not connect with 5 GHz networks. If you are trying to connect to a 2.4 GHz network and still cannot connect, please try moving the appliance closer to your home router.
- How do I erase my Wi-Fi Information?
On the appliance, press and hold both the Wi-Fi button and ‘+’ button for 10 seconds. The Wi-Fi light will flash red for 10 seconds, and then turn off when Wi-Fi credentials are erased. You may also remove your credentials by clicking the trash can icon under Settings in the Alexa App.
- Where can I find the privacy policy and terms of usage?
- What are Hamilton Beach Factory Recertified products?
Hamilton Beach Factory Recertified products are customer returns that have been rigorously tested and inspected and then certified to meet our first-quality specifications. These are typically unused products that have been returned because a customer changed their mind or purchased the wrong item.
- How does it work?
Hamilton Beach receives returned products and carefully inspects, tests, and cleans each item. Products are professionally refurbished by Hamilton Beach, which includes testing operation and inspecting hardware and cosmetic quality. You’ll receive your product in new packaging and ready for use in your home.
- Why should I purchase Hamilton Beach Factory Recertified products?
Buying recertified is an affordable and sustainable way to get a like-new product backed by the Hamilton Beach warranty and return policy.
- Can I return Factory Recertified products?
All Hamilton Beach recertified products are supported by our 90-day warranty and standard Hamilton Beach return policy.
- Why does the light not turn off even when the dial is in the "Off" position?
The light turns on to show that you have power to your Fifth Burner. The light only turns off when the unit is unplugged or does not have power.
(Model 34105) - Can the heating element be removed for cleaning?
No, the heater can not be removed. Once the unit has cooled down, you can lift the heater out of the way and wipe the drip tray clean.
(Model 34105) - What is the Diameter of the Coils / heating surface?
The diameter of the coils / heating surface is 5.5in. (Model 34105)
- What is the wattage of this Induction Cooktop?
The 34104 induction cooker is designed to work with 120V, 60 Hz AC power source. The rated wattage is 1800 watts. (Model 34104)
- Why is there a rattling sound?
With most induction cooktops, a small amount of rattling is to may occur. If the rattling sound is excessive, please contact customer service and we will work to resolve your issue. (Model 34104)
- What size pans can I use?
Induction cooktop ready pans with a radius between 4" to 10" can be used on this induction cooktop. (Model 34104)
- Why does my induction cooktop flash "---" and turn off?
The induction cooktop will flash "---" and beep for 12 seconds then shut off if no pan is detected. A pan must be induction ready for the induction cooktop to energize, use the provided magnet to test if your pan is induction cooktop ready. (Model 34104)
- Why does my induction cooktop display E1 a couple seconds after I plug it in?
If your induction cooktop displays E1 at anytime, please contact customer service and we will work to resolve your issue. (Model 34104)
- Why does my induction cooktop display E2 a couple seconds after I plug it in?
If your induction cooktop displays E2 at anytime, please contact customer service and we will work to resolve your issue. (Model 34104)
- Why will my induction cooktop not work while displaying E3?
If your induction cooktop displays E3 at anytime, please contact customer service and we will work to resolve your issue. (Model 34104)
- Why will my induction cooktop not work while displaying E5?
If your induction cooktop displays E5 at anytime, please contact customer service and we will work to resolve your issue. (Model 34104)
- Why does my induction cooktop display E6 a couple seconds after I plug it in?
If your induction cooktop displays E6 at anytime, please contact customer service and we will work to resolve your issue. (Model 34104)
- Why will my induction cooktop not work while displaying E7?
If your induction cooktop displays E7 at anytime, please contact customer service and we will work to resolve your issue. (Model 34104)
- Why does my induction cooktop turn off 6 minutes after cooking and display E9?
If your induction cooktop displays E9 at anytime, please contact customer service and we will work to resolve your issue. (Model 34104)
- Why does the set temperature listed on the induction cooktop not match what the food temperature in my pan?
The set temperature is measured on the underside of the cooking surface. If you measure the temperature of the food / liquid in the pan, it will be slightly lower than what is shown as the set temperature. (Model 34104)
- My food processor won't turn on. What do I do?
- Verify that the unit is plugged into a working outlet. You may verify that the outlet is working by plugging in a lamp or other appliance.
- If the outlet is not working, try resetting the GFCI by pressing the reset button or reset the circuit breaker at the electrical box for your home.
- Food processors have protective interlocks built in for your safety. Ensure that all parts are properly assembled and locked.
- Some models have a resettable thermal device. To reset, unplug the food processor and allow it to cool for several minutes before trying again.
- If these steps fail, DO NOT attempt to repair the unit. Contact Hamilton Beach Brands Customer Service.
- What do I do if my food is not chopped, sliced, or shredded uniformly?
- For models with multiple chute sizes, ensure that you use the chute size that will best keep foods in the upright position.
- For smaller, thinner foods (like carrots) use the small, round chute or cut the food in half and load pieces side by side in the larger chute. This will prevent the food from falling over and will result in more uniform slices.
- Refer to the food processing charts in your model's Use & Care for recommended food sizes, operation speeds, and food quantities.
- What do I do if my unit has a burning smell?
There may be a residue left on the motor from the manufacturing process, causing a slight odor during initial use. This will go away. If a strong odor or any visible smoke appears, unplug the unit IMMEDIATELY and contact Hamilton Beach Brands Customer Service.
- My motor seems weak, what do I do?
- Don't overfill the bowl or the feed chute.
- When shredding cheese, use firm cheese that has been chilled for at least 30 minutes. Do not remove it from the refrigerator until you are ready to process it.
- Refer to the food processing charts in your model's Use & Care for recommended food sizes, operation speeds, and food quantities.
- Cheese is not shredding well in my unit, what do I do?
Cheese should be processed immediately after being removed from the refrigerator. Soft cheese like mozzarella should be placed in the freezer for 30 minutes prior to processing to ensure it is firm enough for shredding.
- What do I do if nothing is coming out of my spiralizer?
- Check to make sure the food grip on the end of the pusher is firmly inserted into the food before you begin spiralizing. If the grip is spinning on top of the food, remove the food from the chute and cut a new flat edge before trying again.
- Check the spiralizing blade or cone for clogs. Pulp and seeds may sometimes accumulate and need to be cleaned out before proceeeding.
- Apply light, constant pressure to the food pusher while spiralizing. Pressing harder will not speed up the process or make the Spiralizer cut better.
- Check "Success Tips for Spiralizing"
- How do I lock the food processor lid?
For traditional twist-lock models, align the cutout notches on the food processor bowl with the base. Holding the handle firmly, turn bowl clockwise until it locks into place. To attach the lid, align the cutout notches of the lid with the food processor bowl. Place one handle on the lid and the other on the handle of the food processor bowl. Turn lid clockwise until it locks into place. NOTE: The food processor will not operate until the lid and bowl are properly locked.
For Stack & Snap Models, place the bowl on the base so it sits flat and level. Place the lid on the bowl so the pour spouts align and the feed chute is next to the handle. Push lid latches down until they snap into place. For models that come with a locking arm instead of latches, raise the locking arm up and over the bowl until it snaps into place. Note: The food processor will not operate until the lid is fully secured by the lid latches or locking arm.
- How do I unlock the food processor lid?
Ensure the food processor is turned off and unplugged.
For traditional twist-lock models, turn the lid counterclockwise until it unlocks. Lift the lid off the bowl. Holding the handle firmly, turn the bowl counter clockwise unitl it unlocks and the lift the bowl off the base.
For Stack & Snap Models, lift up on lid latches to unlock the lid and remove it from the bowl then simply lift the bowl straight up to remove it from the base. For models that come with a locking arm instead of latches, lower the arm to the counter before removing the lid and bowl from the base.
- How do I prevent the food processor bowl from leaking?
Some food processors bowls are fully sealed in the bottom and some have an opening. To prevent leaks, do not fill the bowl above the MAX fill line. Refer to your model's Use & Care for more information.
- It is difficult to remove lid from bowl(s) or bowl(s) from base, what do I do?
- After washing in the dishwasher, allow parts to return to room temperature prior to placing on base.
- For models with cutout notches in the food processor base, bowl, and lid, a small amount of vegetable oil may be placed on snaps for easy removal.
- What speed should I use for slicing and shredding?
We recommend the lowest speed for slicing and shredding. It may be marked "Speed 1" or "Lo".
- What speed should I use for chopping?
We recommend using the PULSE button for chopping. Press in short bursts for more precise control and check progress frequently.
- What speed should I use for pureeing and mixing?
We recommend the highest speed for pureeing and mixing. It may be marked "Speed 2" or "Hi".
- What speed should I use for kneading dough?
For models that include a dough blade, we recommend the highest speed kneading. It may be marked "Speed 2" or "Hi".
- How can I slice and shred with the same attachment?
Most stainless steel discs are reversible. One side is generally for shredding and the other side is for slicing. Look for the word "SHRED" or "SLICE" on the disc and make sure the function you desire is facing UP towards the lid. For example, if you want to SLICE, install the disc with the word "SLICE" facing up.
- Which blade should I use for making bread dough?
Either the plastic dough blade or the metal chopping blade can be used for making pastry, bread or pizza dough. The plastic dough blade has shorter, blunt arms that gently pull and tear dough to knead it. This works well for bread and pizza doughs that knead for a little longer time necessary to develop the gluten in the dough. The metal blade cuts through the dough to quickly cut in butter or shortening, making it the perfect choice for making pie dough.
- How long should I knead dough in a food processor?
The speed of a food processor makes quick work of the kneading process in bread baking. Where kneading by hand can take a very long time, a food processor can accomplish the task in seconds. Start with the dry ingredients in the food processor and with food processor running, add the liquid ingredients. Pulse until the mixtures forms a ball by incorporating all the dry ingredients. Then knead for 45 seconds with a metal blade or 60 to 90 seconds with a plastic blade. Properly kneaded dough should be smooth and elastic. If pulled, it should have a springy texture.
- How long should I process for pie crust dough?
Unlike bread dough, pie crust dough should be processed only long enough to bring the dough into a ball. Pulse the flour and butter mixture several times JUST until the butter is processed into pea-sized pieces. Do not over-process. Add ice water through feed tube and process JUST until dough begins to come together. Add additional ice water as necessary. Small butter pieces should still be visible in dough.
- Can I make cookie dough with a food processor?
Yes you can. In fact, it’s super easy to start without waiting to soften butter. The dough blade or metal blade chops up cold butter and quickly creams it with the sugar. Add the remaining ingredients and pulse to combine into a dough.
- Why didn’t my bread rise?
The high speed of the food processor creates heat from the friction of the motor. For bread dough, use cool water and do not over process. Processing too long heats the dough which can kill yeast and prevent the dough from rising. For pie crust dough, start with chilled butter and add ice water to prevent the butter from getting too soft.
- What blade or disc should I use for what foods?
- Chopping/Mixing Blade: Chop: nuts, meat, garlic, onions, peppers, celery, herbs, bread (for crumbs), crackers Mince/Puree: vegetables, fruit; Mix: salad dressings; Puree: soups, sauces; Grate: cheese, such as Parmesan (chilled)
- Slicing Disc (SLICE facing up) Cucumbers, apples, mushrooms, carrots, potatoes, cabbage, tomatoes, pepperoni, peppers, radishes, firm cheeses (chilled)
- Shredding Disc (SHRED facing up) Cabbage, potatoes, carrots, cheese (chilled)
- How do I clean food particles that are stuck in the back of the food chute above the handle?
Place back of the food chute under running water to rinse out the food.
- Are parts dishwasher safe?
Most food processors parts are dishwasher safe in the top rack. Refer to your model's Use & Care for more information.
- How do I store the attachments?
For most of our food processors, we recommend storing the attachments inside the bowl. Install the chopping/mixing blade on the motor shaft in the bottom of the bowl, install the slicing shredding disc on the top portion of the motor shaft. Place the pusher in the chute and the lid on the bowl. For some models, you may store the lid upside down on the bowl for compact storage. For models that come with an attachment storage case, refer to the Use & Care for more information.
- How do I clean the food processor?
- The blades are very sharp so use extreme caution when handling them.
- Wash Bowl, Lid, Food Pusher, Blades, and Discs in hot, soapy water or place in dishwasher. For hard to reach areas, you may use a stiff bristle brush.
- Wipe Base, Controls, and cord with a damp cloth or sponge. If necessary, use a mild nonabrasive cleanser. Never place in water or rinse under running water or other liquid.
- DO NOT use the “SANI” setting when washing in the dishwasher, top-rack only. “SANI” cycle temperatures could damage your product. All removable parts may also be cleaned in the sink with hot, soapy water. Use caution when washing Chopping/Mixing Blade and Slicing/Shredding Disc.
- Is it BPA free?
Yes
- What is a food processor used for?
- When it comes to a multifunctional kitchen appliance, the food processor reigns supreme. Its ability to make very quick work out of so many food prep steps – from chopping, to shredding to pureeing – is why it pulls rank over other kitchen tools. Plus, it’s the must-have culinary workhorse for anyone that prefers homemade staples like nut butters, flours and spreads over store-bought.
- Our consumer insights indicate that the top uses of a food processor are making dips, shredding cheese, preparing salad, chopping herbs and making sauce. The top ingredients used in a food processor include onions, cheese, carrots, herbs and garlic.
- Is a food processor the same as a blender?
- No. Blenders are typically used for liquids and ice crushing - foods like smoothies, sauces and soups. Food processors do not require liquid and are intended for more labor intensive tasks like shredding, slicing and chopping.
- A food processor comes with an S blade or a chopping and mixing blade used to coarsely chop, grate, mince, mix or puree food. Reversible shredding and slicing disc can be used to shred cabbage for coleslaw, potatoes for hashbrowns or carrots. Slice cucumbers, apples, mushrooms, carrots, potatoes, cabbage, tomatoes, radishes and more when throwing together the perfect summer salad. Food processors make quick work of tedious tasks. For prepping meals ahead, use your food processor to prepare vegetables in bulk and then store them in the fridge. They are then ready to add to salads, mix into soups, or top pizzas on weeknights. At holiday times, the food processor is a big help in batch processing onions, celery, bread crumbs, etc. you would need for multiple dishes.
- How do I choose the best food processor for me?
Choose the Attachments
- Usually different food processors will come with an assortment of discs and blades to serve a variety of food preparation tasks. Most food processors come standard with a chopping/mixing blade and a reversible slicing/shredding disc. These are great for common tasks like shredding a block of cheddar cheese, mixing up a batch of hummus and slicing cucumbers quickly for a salad. Higher-end models may come with adjustable slicing and shredding blades so you can customize the thickness of the cut or the coarseness of the shred. More extras that you might look for are dough blades, dicing discs or crinkle cut discs.
- More Bells and Whistles
- Another feature you might find in Hamilton Beach food processors is a built-in bowl scraper. Sometimes during food processing, you may find that ingredients stick to the walls of the bowl and you have to stop, take the lid off the processor, and mix the ingredients back toward the blade. The built-in bowl scraper feature makes it possible to scrape the sides of the bowl without having to disassemble the food processor, saving you time.
- There’s no one-size-fits-all food processor, but they all have features and functions dedicated to making your time spent in the kitchen easier and more enjoyable. By thinking about what is most important to you, you can begin to narrow down the many choices until you have found that perfect fit.While some food processors can be a hassle to clean, our thoughtful design elements like in-bowl blade storage and dishwasher-safe parts make these food processors easy to clean and store. Some of our food processors even offer special conveniences like reversible slicing and shredding discs and continuous feed chutes. Choose the food processor size that works for your home — from 8 to 14 cup food processors — and that fits your cooking style. Whatever recipe you plan on cooking, our food processors will cut down on your prep time. "
- Success Tips for Spiralizing
- Start by choosing the best foods for spiralizing. Here is a general rule: Think about what foods will work well on a manual
food grater. If you can grate a food, it should spiralize well. - Solid fruits or vegetables work better than those that have seeds. Seeds get caught in the Blade and will not make uniform
spirals. For vegetables such as butternut squash, use the solid part and save the end with seeds for another use. - Size does matter. The best foods for spiralizing are the ones that most closely fit the size of the Food Chute.
- When making ribbons, symmetrical foods (like zucchini or cucumbers) will produce better results. Large foods can be cut
to fit the Food Chute but ribbons may not be as uniform or pretty. - Scrub or peel your fruits and vegetables before spiralizing. When practical, you should peel the food. Peels add to the
pulp that can get caught in the Blade. Zucchini, yellow squash, cucumbers, and apples are examples that you could leave
unpeeled. - Center the item in the Spiral Slicer for more even cutting. Foods that are held vertically with the Food Pusher will give the
best results. - Apples, pears, and potatoes are examples of foods that turn brown quickly when cut. To avoid browning, sprinkle fruit
with lemon juice and place potatoes in water until ready to use. Be sure to pat dry thoroughly with paper towels. - Spiralized fruits and vegetables can be eaten raw or cooked. Most noodles can be stored 2 to 3 days in the refrigerator in
covered containers. - Dry the noodles with paper towels before serving or, if desired, blanch them in water to avoid watery sauces. Reduce
sauces before topping noodles to prevent thinned-down sauces. - Spiralized fruits and vegetables will be processed in very long strands. Use a knife or scissors to cut the produce into
serving-sized pieces.Use tongs or a pasta fork to serve the noodles. - The 1-inch (2.5 cm) leftover piece from processing can be eaten as a snack or saved to use in stock, soups, or salads.
- When spiralizing long food items, guide the item to keep it centered in the Food Chute.
- Start by choosing the best foods for spiralizing. Here is a general rule: Think about what foods will work well on a manual
- How do I attach and/or remove the brush?
To attach: simply slide the brush on (do not be afraid, it will not break). To detach: simply slide the brush off, using your thumb for strength.
- How do I change the voltage?
Make sure the unit is unplugged. Insert a small screwdriver into voltage switch (on belly of steamer). For 120 volts, slide switch to the left. For 240 volts slide switch to the right. (If using the 240 volts, you must use an adapter plug.)
- How do I unfold/extend the handle?
Lift the handle release (see Use and Care booklet for part names; the handle release is a rectangular shaped knob) and turn one quarter turn, rotate handle clockwise to extend. Lock handle release with one quarter turn. To fold for storage, allow the unit to cool, lift the handle release and turn one quarter turn, rotate handle into folded position, and lock handle release with one quarter turn.
- How much water will the units hold?
5 ounces (a little less than a 1/4 cup)
- What features does model 10083 have?
Model 10083 has the following features: a folding handle for easy storage, dual voltage (120-240v), a handy travel pouch, and a grooming brush.
- What is the round button for?
Steam — press it about every 3 seconds.
- Where is the model and mfg. date located?
The model and mfg. date is located under the handle. You must unfold the handle to see it.
- Garment steamer does not produce steam.
- No water in the water reservoir. Add water and follow instructions for use in the use and care guide.
- The garment steamer is not plugged in. Verify power to the outlet and plug the garment steamer in.
- Reservoir is not installed properly. Ensure that removable reservoir (if equipped) is in the locked position.
- The pump is not primed. Hold down the steam button for a few seconds to get water flowing.
- Garment steamer is spitting.
- The garment steamer is not preheated. Wait a minute before trying to steam to ensure the unit is properly preheated.
- Clean the garment steamer according to the instructions in the use and care guide.
- Make sure to never add any chemicals (starch, descalers, or fragrance) to the reservoir. Steamers are designed to be used with water only.
- Garment steamer produces less steam.
Water deposits will block pathways inside the steamer, causing less steam to be produced over time. The garment steamer will need to be cleaned to reduce these deposits and restore performance. Instructions for cleaning can be found in the use and care guide for your steamer.
- How often should I clean my garment steamer?
- We recommend emptying the reservoir and leaving the reservoir cap open after every use to ensure that there is less risk for deposits to build up that could discolor clothing.
- At least once a month or as needed, based on performance and water hardness, you should perform a cleaning to remove minerals and sediment from the garment steamer. Instructions for cleaning can be found in the use and care guide for your steamer.
- Garment steamer is leaking water.
Unplug the steamer and verify that the fill door on the reservoir is closed and the removable reservoir (if equipped) is locked in place. Dry the unit off. If the leak persists, do not operate the steamer. Contact the customer service line.
- How should I clean my garment steamer?
- Refer to the instructions included in the use and care guide for your product.
- Generally, a 50/50 mix of distilled white vinegar and water should be used to fill the reservoir. After running the vinegar solution through the garment steamer, the reservoir should be completely emptied, rinsed, and refilled with water only. The steamer should then be run again with just water to flush any remaining vinegar before being used on clothing.
- What type of water should I use?
Tap water is recommended because it has minerals that "season" internal parts. In areas with hard water, use a 50/50 combination of distilled and tap water.
- I am traveling abroad; can I use this garment steamer?
All US model steamers are designed to work with 120V, 60 Hz power commonly used in the US and Canada. In order to use these abroad, a voltage converter AND a plug adapter appropriate for the local power and compatible with the wattage of the appliance must be used in order to ensure that no damage is done to the electronics.
- Rusty/dirty water is coming out of my garment steamer.
This is a result of water deposit buildup in the unit. Follow the cleaning instructions to remove this buildup and ensure that only clean steam is produced.
- I just unboxed my new garment steamer. There are water droplets in the reservoir. Has it been used?
Before being sold, all of our garment steamers are tested with water at the factory to ensure they are free from defects. While we do our best to empty the water out of the steamers, a small amount of residual water may remain in the reservoir. This is completely normal and does not mean that the garment steamer has been used by another customer.
- What are some helpful tips for getting the most out of my garment steamer?
- To avoid garment damage, check the garment label for fabric content and any steaming instructions.
- Hang garments on a plastic hanger for easier steaming. Wooden hangers will get damaged if used for steaming clothes.
- Wait 10 minutes before wearing your steamed garment or storing it in a closet.
- When steaming, lightly touching fabrics with Fabric Brush will help with wrinkle removal. It is important to make contact with the garment/fabric when using the Fabric Brush.
- For more difficult wrinkles, try steaming from the underside of the fabric. This allows fibers in fabric to relax.
- Pants are more easily steamed upside down, with pants hanging from cuffs.
- What types of repairs are possible for a garment steamer?
None, we recommend against making any type of repair.
- Should I be able to hear the speeds change?
Not necessarily. Usually you will not be able to hear the changes other than from low to high.
- What is the material of hand mixers attachments? Are the beaters stainless steel or chrome?
All beaters, dough hooks and milkshake attachments are chrome-plated. Whisks are stainless steel, except for the shaft which is chrome-plated. We recommend washing all attachments by hand and drying them immediately to prolong life.
- Is there an on/off switch as noted in the Use and Care Safeguards?
No. The Use and Care Safeguards section covers standard UL requirements. These grills don't need an on/off switch. Simply remove the cord from the outlet, then disconnect the prong from the grill.
- What are the 2 cooking surfaces?
A standard grilling surface and a solid surface.
- What type of coating is on the grill?
The coating is an industry standard nonstick coating (fluorocarbon).
- Is the unit dishwasher safe?
Yes, the grill and the drip tray (base) are dishwasher safe. (This does not apply to the MealMaker Express™ - only its drip tray is dishwasher safe.)
- What is that silver coating on the drip tray?
The silver coating (if on your model) is a heat-reflective paint.
- What is the drip tray (base) made of?
Phenolic, a hard plastic that is heat resistant, or aluminum (depending on your model).
- What is the cooking grid made of?
Die cast aluminum with a nonstick coating.
- Can a degreaser be used to clean the grill?
Yes, our Home Economist tested, and it proved to ease the cleanup process and not harm the grill or base.
- Can I purchase a variable temperature setting plug to replace my standard plug?
If your grill came with a standard plug, a variable temperature plug cannot be used.
- Can aluminum foil bags be used on the grill?
Yes, and the bags make cleanup easy. Make sure to turn the bag over at least once halfway through the cooking cycle to prevent burning.
- Why do the instructions request that I unplug the power cord from the outlet first and then unplug it from the unit?
As a safety precaution, units that do not have on/off switches should be unplugged from the outlet first.
Example: If the cord was unplugged from the unit and it was dropped on a wet surface, it would be unsafe. If the cord was first unplugged from the wall outlet, there would not be a safety hazard. - How long should I preheat the grill before cooking on it?
At least five minutes.
- Can I cook meat on the top half of the MealMaker Express™ when it is folded open?
Yes, our Home Economist has cooked up to 6 hamburgers at one time on the top half. However, bear in mind that the top half does not have a drip tray so fatty meats should be avoided in case there are significant grease drippings. We recommend this area be used for vegetables, eggs, breads, etc.
- Can vinegar be used to clean the iron?
NO, use only clear water in the reservoir unless directed otherwise in the Use & Care instructions.
- How do I clean the soleplate?
To protect the soleplate from scratches, never iron over buttons, zippers, metal rivets, or snaps.
To clean starch build-up and other residue from the SilverStone® soleplate (feature found on selected models), unplug the iron and allow it to cool. With iron in upright position, clean the nonstick surface with a warm, sudsy cloth or sponge; wipe dry.
DO NOT USE any abrasive cleaners or metal scouring pads as they may damage the nonstick surface.
To clean starch build-up and other residue from the Smooth Glide aluminum soleplate, unplug iron and allow it to cool. With iron in upright position, clean the soleplate with a damp cloth or sponge and a paste made of baking soda and water.
DO NOT USE abrasive cleaners or metal scouring pads as they will scratch the smooth surface. - How much do the full-size and lightweight irons weigh?
The full-size weighs about 2 lbs. 4 oz; the lightweight iron weighs about 1 lb. 6 oz.
- Why does the light stay on when the unit is turned off?
The light is a power on light, and it will remain on while unit is plugged into a power outlet. ALWAYS UNPLUG THE IRON AFTER USE.
- How do I store the iron?
Store the iron in the upright position, never wrap the cord around the iron and empty all water from the iron. It is best not to store the iron in dust prone areas such as a laundry room where dust can settle in the opening of the water reservoir; dust will eventually cause blockage and prevent the iron from steaming.
- Why does the iron leak while using the "Blast of Steam"?
Pumping the "Blast of Steam" button will cause the chamber to flood and the unit will leak or drip water from the vents. Press button twice, allow the blast of steam to evaporate, then repeat.
- What type of water should I use?
Tap water is recommended because it has minerals in it that actually "season" internal parts. However, in hard water areas, use a combination of bottle and tap water.
- What do I do when the iron shuts off and will not come back on?
Some irons have an Automatic Shutoff feature. There are several ways the automatic shutoff feature works. Try the following:
- Turn unit off, unplug the iron from the outlet and plug back in, turn unit on.
- Press the reset button on the control panel.
- Rapid movement of the iron (a quick shake).
- How much current does the power light use?
The average iron light pulls .001 total amps.
- Why does the iron not glide over the material?
The iron must preheat for 5 minutes to allow the thermostat to stabilize, and it must be set on the proper temperature for the type of fabric you're ironing.
- Why does my iron leak from the steam vents?
Several things can contribute and cause this problem: 1) Sole plate is not hot enough 2) Defective steam valve allowing to much water into the sole plate 3) Using distilled or soft water in the iron. [we need to expand and tell the consumer how to determine if the soleplate is not hot enough or whether the valve is defective]
- What temperature is each setting?
Nylon 240F, Silk 275F, Polyester 310F, Rayon 330F, Wool 360F, Cotton/Linen 375F. Remember: The average temp. may vary 15 degrees F (+ or -)
- What causes rusty spots to come out of the steam vents?
Leaving water in the iron when not in use may result in rusty looking steam.
- What causes the iron not to steam?
Accumulation of minerals in water can block steam vents, preventing water from dripping into the steam chamber.
- Why will my iron not spray?
First, try pumping the "Spray" button several times to "prime the spray." If this doesn't resolve the issue, the intake tube may be clogged or there may be a kink in the intake tube.
- What type of repairs are possible/feasible for an iron?
None. We recommend against making any type of "repair."
- Where is the model, type and series number located?
Model number, type number, series code and wattage information is located on the rating label. The rating label is located on the heel (end) of your iron.
- How do I determine the watts of my iron?
Watts are determined by multiplying the amps by the volts.
- How do I determine the amps?
The amps are determined by dividing the volts into the watts. Example: volts= 120, watts=1000, therefore 1000 divided by 120 = 8.3amps.
- What parts of my iron are replaceable?
None. We recommend against making any type of "repair." There are no replacement parts for irons.
- Can I use vegetables as well as fruits in my juice extractor?
Yes, vegetables can be used in the juice extractor.
- Do I have to peel and take the seeds out of the fruit first?
It depends on the type of fruit. Citrus fruit must be peeled first; with all other types of fruit, it's not necessary. Also, only large pits found in certain fruits like peaches must be removed first.
- Can I use frozen vegetables and fruits?
In order to achieve optimum juicing you should thaw your vegetables and fruits prior to juicing. Thawed vegetables and fruits produce the most juice.
- Do I have to stop periodically to let the motor cool down?
It is a good idea to allow the motor to cool during juicing. The main thing to do to optimize juicing is to ensure that the basket area and pulp bin are cleaned often, because this is what slows the juicer down and causes the motor to heat up.
- How do I remove food stains from the juice extractor?
Acids in various foods will cause discoloration, this is normal.
Helpful Hint: Add about 1/2 cup bleach to dish water and allow external parts to soak. This will remove most stains - Where is my juice cup?
- A juice cup is supplied with these models: 67608A, 67608Z, 67608C, 67650A and 67650.
- A juice cup is not supplied with these models: 67601, 67601A, 67602, and 67702.
- If your model does not have a juice cup, you can use a drinking glass or measuring cup to collect the juice or purchase a juice cup as an accessory from hamiltonbeach.com.
- Will the juicer overheat?
Under normal usage, your juicer shouldn’t overheat. The motor has a built-in safety device that prevents overheating and damage to the motor. However, if the motor does stop running, unplug and let it cool for 15 minutes.
- Why is the juicer vibrating?
There may be a buildup of pulp in the strainer basket. Turn the juicer OFF and unplug. Clean the juice cover and strainer basket using the included cleaning brush or your own soft bristle brush and try again.
- Is the unit stable on the counter?
Yes, the unit is stable on the counter, and should remain in place with little movement during use. The juicer may move slightly when first switched ON as the motor quickly ramps up to full speed.
- Why won’t my juicer turn on?
- Make sure your juicer is assembled correctly. Verify the latches are secured over the lid. The latches should be flush with the housing.
- Verify the juicer is plugged in and the outlet is working.
- Verify the juicer’s Power switch is working. It should easily rotate or toggle to the ON position.
- If you have been using the juicer for 15 minutes or more, the motor overload protection may have been activated. Unplug for 15 minutes to reset.
- Can you place whole foods in the food chute?
Yes, the 3-inch food chute will accommodate many whole fruits and vegetables without precutting. Citrus fruits, melons and mangoes should be peeled before juicing to minimize impact on flavor. Fruits with large seeds or pits such as mangoes, peaches, plums and cherries must be pitted before juicing.
- Why is my motor stalling?
- Always turn the juicer ON before inserting food.
- The juicing action may be too vigorous. Try slower juicing action by pushing the food pusher down more slowly.
- Wet pulp can build up under the juicer cover or pulp container. Turn the juicer OFF and unplug. Empty the pulp bin; then clean juice cover and strainer basket using a soft bristle brush and try again.
- How do I clean the juicer?
- Clean the strainer basket immediately after juicing. Using the included cleaning brush or your own soft bristle brush, hold the strainer basket under running water and brush inside and outside the basket.
- All removable parts can be washed in warm, soapy water or in the dishwasher.
- To minimize cleanup, place a plastic grocery bag in the pulp container to collect the pulp. When finished juicing, remove and discard.
- Do not allow food particles to dry on strainer basket. Cleaning will be more difficult if food dries on parts. Place parts in warm soapy water and let sit for 5 minutes.
- What is the warranty period?
3 years from point of purchase
- Are replacement blades available?
Yes. Replacement blades are available for purchase at hamiltonbeach.com
- Why is the blade release button not working?
Firmly push down the blade-release button or buttons. Grasp plastic guard, with hand away from cutting edge, and carefully pull until blades release. For models with 2 release buttons (one on each side), ensure both are being pressed at the same time in order to release the blades.
- Can the knife be locked into the "On" position?
No. For saftey reasons, the electric knife cannot be locked in the "On" position.
- What is the wattage for the knife?
- 74311Y: 100W
- 74250R: 100W
- 74275R: 100W
- 74275Z: 120W
- Is this knife cordless?
No. Our electric knives are not cordless. They have extra long 5 - 6 foot cords to allow for easy maneuvering. Cordless knives require a battery pack that makes the knife significantly heavier and more expensive.
- Why are the blades not moving?
Unplug the unit and ensure that the blades are securely inserted into the handle. Holding the blades by the plastic guard, slide into handle until both blades click into place.
- What is the length of the power cord?
- 74311Y: 58 inches
- 74250R: 58 inches
- 74275R: 60 inches
- 74275Z: 60 inches
- What is the length of the blades?
- 74311Y: 6.5"
- 74250R: 6.5"
- 74275R: 8"
- 74275Z:
- Utility Knife: 5 inches
- Carving Knife: 8 inches
- Can the blades be sharpened?
No, the electric knife blades cannot be sharpened. The blades are serrated and should remain sharp under normal usage. Should you need replacement blades, they are available for purchase at hamiltonbeach.com.
- Why is the blade release button hard to push in? Is there something wrong with the switch?
The blade release button pushes forward to release the blades. The button is not part of the switch at all. The button releases the blades so that they can be pulled out gently by holding the two plastic guards on the end of the blades.
- Will the handle get warm to the touch?
Heat is generated by the motor inside the knife. It may become warm when cutting dense foods or when used for an extended period of time. If this occurs, unplug the knife and allow it to cool for a few minutes before proceeding.
- How long does the knife need to cool down?
5 - 15min depending on how long the knife has been in continuous use. Please allow the knife to cool down before using again.
- 74100 Model:
The blade will not release if the knife is being held at a 45 degree angle. To release the blades, turn the knife to the "straight up position" and press the button.
- Are the blades dishwasher-safe?
No. While holding the protective sleeve, remove the blades from the unit and wash the blades in hot, soapy water. Rinse and dry thoroughly. After washing and drying, immediately place blades into the protective sleeve for storage.
- The blades have fallen out or have separated.
If blades have separated or have fallen out, pick up by the plastic guard. Slide the rivet on one blade into the keyhole slot in the other blade until they are locked together.
Holding blades together at the base of the blade with cutting edge down, slide into handle until both blades click into place. - What can be cut with the Electric Knives?
Hamilton Beach Electric Knives can be used to cut a variety of things such as: ham, bread, turkey, roast, brisket, fish, poultry, fruits, vegetables, and foam for DIY projects.
It is not recommended to cut very hard things like bones and wood with the Electric Knives.
- How can I tell if my pasta is too wet?
The pasta dough is too wet if the dough is balling up around the mixer or a large amount of dough is stuck to the side of the mixing bowl. Additionally, the dough may be too wet if the pasta maker is struggling to extrude the dough. Please note that even with the correct consistency, the dough extrudes slowly at the beginning and speeds up over time. See Use & Care page 6 for tips to identify correct pasta consistency.
If your dough is too wet, press "START / STOP" button and unplug. Remove the lid and break up any clumps or balls of dough with your hands. Add 2 Tablespoons (30ml) or flour to the dough. Replace lid and plug back in. Press "KNEAD DOUGH", then "START / STOP". Repeat as necessary for desired consistency. Once desired consistency is reached, press "EXTRUDE PASTA" to begin making pasta.
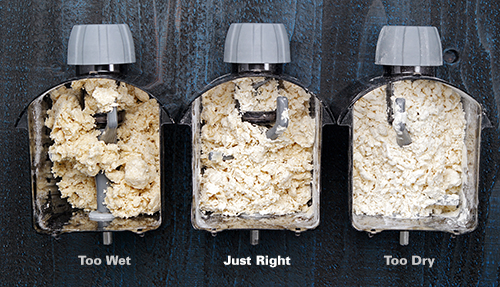
- Why is it taking so long to make my pasta?
If the pasta maker is taking too long to make, the pasta dough may be too wet or too dry. It may also take longer to make if there is over 1.5lbs of pasta in the mixer.
For optimal performance while using the Hamilton Beach Pasta Maker, it is crucial the pasta dough in the mixer is the correct consistency. The dough consistency will not look like normal pasta dough when making traditional pasta. Instead it will look more like pie crust dough. Please reference page 6 of the Use & Care for the correct dough consistency.
If the consistency is correct and it is taking over 30 minutes to make pasta: please email pasta.support@hamiltonbeach.com. We will be happy to assist you in troubleshooting your pasta maker.
- Why does the pasta maker leave dough after mixing?
When the pasta or quick pasta modes are selected, there may be a little pasta dough left over after the pasta maker has shut off. Simply remove the lid and push the remaining pasta dough to the front of the mixer. Place the lid back in place and press "Extrude Pasta" button to extrude pasta dough.
- Does the unit have an automatic pasta cutter?
No, the pasta maker does not have an automatic pasta cutter. The user must cut the pasta to the desired length.
- Does the pasta need to be dried on a rack after?
No, the pasta does not have to be dried on rack after extruding.
- Can you store the pasta or does it need to be cooked immediately?
Once pasta is extruded, either cook pasta immediately, store in an airtight container in the refrigerator for up to 3 days, or store in a freezer safe container in the freezer for up to 3 months.
- Why is the liquid not going in through the slots?
Some eggs or liquid mixtures may be thicker than the slot thickness. If this happens, press "START / STOP" remove the lid and add the liquid mixture. Press "START / STOP" to restart mixing. Repeat process until desired consistency is reached.
- How can I tell if my pasta is too dry?
The pasta dough is too dry if the flour has not clumped together at all or the pasta is falling apart when being extruded. See Use & Care page 6 for tips to identify correct pasta consistency.
If your dough is too dry, add 5-10ml of liquid and continue to mix. Repeat as necessary for desired consistency.
- Which parts are dishwasher safe?
All removable parts are dishwasher safe (top rack only).
Please note: Do not mix dough with water as it will mud and be diffcult to remove. Instead, allow the dough to dry before using the cleaning tool. If dough will not come out easily, place parts or disc in freezer for 30-60 min, then try again.
See additional tips on page 10 of the Use & Care for more cleaning tips.
- My unit is displaying an error code, what does it mean?
E02 - Mixing bowl lid is not in place.
E14 - Too much flour in the mixing bowl.
For errors E04, E05, E09, E15, E17- Unit will need to be sent in to be evaluated.Please email pasta.support@hamiltonbeach.com and we will be happy to help you further.
- Why did my pasta maker shut off while mixing?
The pasta maker may shut off during mixing if your dough is too wet or there is too much dough in the mixer. Ensure the pasta is the correct consistency and there is not too much pasta dough before restarting the pasta maker.
If you continue to have problems, please email pasta.support@hamiltonbeach.com. We will be happy to assist you in troubleshooting your pasta maker.
- How many pasta shaping discs come with the unit?
There are 7 shaping discs included with this unit. These include: Thick Spaghetti, Lasagna, Spaghetti, Angel Hair, Wide Noodle and Fettuccini.
- What are the dimensions of the pasta maker?
The dimensions of the pasta maker are H:11 in x W: 8 in x D:10 in
- Are the plastics parts BPA free?
Yes, all food zones are BPA free.
- Can this make pasta without eggs?
Yes, a simple pasta recipe that does not require eggs is supplied on page 6 of the Use & Care. Recipes that include eggs are on page 7 of the Use & Care.
- What is the correct dough consistency?
Please reference the following picture and the "How can I tell if my pasta is too wet?" or "How can I tell if my pasta is too dry?" for more specific details.
- Pasta Maker Overview Video
Watch our video for a product usage overview.
- Initial Test Run. What is it? Why is it important?
The Initial Test Run(Take a Test Run; page 6 of Pressure Cooker Use and Care) helps you become familiar with your Pressure Cooker. It takes 3 cups (711 ml) of water and a 2 minute cook cycle. The Test Run is a great way to ensure that the Pressure Cooker is functioning properly, that the gasket is correctly installed in the lid, and for you to understand how sealing as well as steam release works.
- What is the steam release valve, and why does it leak steam?
The Pressure Cooker’s Steam Release Valve is a safety device, that regulates the internal pressure of the Cooker by pressing weight on the Steam Release Stem.
The Pressure Cooker’s Steam Release Valve has a pressure rating of 15 psi. The Steam Release Valve keeps the working pressure always under the 15 psi pressure rating by allowing excess steam to escape from the Cooking Pot.
It is normal and safe for small amounts of steam to leak from the Steam Release Valve while operating the Pressure Cooker.
In fact, the steam seen is evidence that the Steam Release Valve is effectively regulating the pressure.
- How do I release steam?
When the cooking cycle is complete, steam must be released before the Lid can be opened. There are two ways to release steam:
To release steam / pressure naturally (Natural Pressure Release) let the cooker sit approximately 10-30 minutes after cooking until the float valve goes down and Lid unlocks.Note: It may take longer depending on the amount of food being prepared. During natural release, food is still warm and may continue to cook for the amount of time it takes to release the steam.
To release steam / pressure faster (Quick Pressure Release )press Steam Release Button to allow steam to escape. The Steam Release Valve directs steam away from the Steam Release Button. Choose quick release when you want to stop the cooking immediately when cycle ends. Please note, this is not recommended if you’re cooking food with high starch content, which may cause spattering.
- What is the difference between natural pressure release and quick pressure release?
Natural pressure release allows the pressure cooker to cool down naturally until the float valve drops down. This may take 10 to 30 minutes, or even longer, depending on the amount of food in the cooker. For food with large liquid volume or starch content, use the natural release method as thick liquid may splatter out.
Quick pressure release allows the cooker to cool down quickly by letting the steam out of the pressure cooker manually until the float valve drops. (Note: Never pull out the steam release valve while it is releasing steam as escaping steam is extremely hot and can cause burns.)
- What are the safety mechanisms of the pressure cooker?
- Steam release valve, float valve and pressure relief safety valve: Ensures the working pressure of the pressure cooker is under the safety limit.
- Steam release valve cover: Prevents food debris from blocking the steam release valve.
- Safety lid lock: Prevents accidental opening of the pressure cooker while the cooker is pressurized.
- Automatic temperature control: Regulates the internal temperature of the pressure cooker based on the type of program selected by the user.
- Automatic pressure sensor: Keeps the working pressure operating in a safe range.
- Electrical current and temperature fuse: Cuts off power if the current or internal temperature exceeds safety limits.
- Excess pressure protection: Gasket relieves itself thus breaking the seal and allowing excess pressure to safely exit the internal chamber of the pressure cooker in an abnormal situation.
- How do I know when to replace the Pressure Cooker Cooking Vessel?
Under normal use we do not anticipate any defect to develop with the Cooking Pot.
NOTE: When placing the cooking pot inside the appliance, ensure that the cooking pot is in direct contact with the heating plate, rotate slighly to the left and right unit it seats properly, or it will cause damage to the heating elments and even other components.
- How do I know when to replace the Pressure Cooker Gasket?
The Gasket is made from food safe silicone. Under normal use it should last 2~3 years. If you notice tears, cracks, signs of leaking, deformation or any other damage to the Gasket, you should replace it with a Hamilton Beach Gasket.
The Gasket is dishwasher safe; however to extend its life we reccommend handwashing it.
- What are High and Low pressure settings?
High Pressure is from 8– 12 psi and Low Pressure is from 4 – 7 psi.
High Pressure is recommended for almost all foods(i.e meat, poultry, beans, etc). The higher the pressure, the faster food cooks.
Low Pressure is used for delicate foods(i.e rice, vegetables, etc). Lower pressure cooks food slower when compared to high pressure.
- How do I clean the pressure cooker lid?
Unplug unit. Allow unit to cool and pressure to release. When all of the steam has exited the unit, the lid will automatically unlock. Rotate the lid counterclockwise to remove.
Remove Gasket from Lid by pulling out from under metal ring.
Pull up Steam Release Valve to remove from Lid. Flip Lid over and unscrew Steam Release Valve Cover from underside of Lid.
Hold Lid at an angle, and use a small, soft brush to clear the Float Valve, Steam Release Stem, and Pressure Relief Safety Valve of any debris. Rinse these
areas with warm water.Wash Steam Release Valve, Steam Release Valve Cover, Lid with warm, soapy water. Rinse and dry. Ensure that Steam Release Valve, Steam Release Valve Stem, Float Valve, and Pressure Relief Safety Valve are clean and free of debris.
Reassemble Lid Parts and reinsert Gasket.
Please refer to the Care and Cleaning Section of the Use and Care (pg. 14) for more cleaning tips.
- Is the pressure cooker dishwasher safe?
The cooking pot, gasket, roasting rack, rice measuring cup, rice paddle and condensation collector are dishwasher safe.
Though the gasket is dishwasher safe, to extend its life, we recommend hand washing it.
- How long after selecting the settings will the cooker Start?
10 seconds after selecting your settings, the cooking process will start. The cooker will beep 3 times and the LED displays ON.
- How full (food and liquid) can the cooking pot be for pressure cooking?
For all pressure-cooking programs the total amount of pre-cooked food and liquid in the Cooking Pot should not pass the 2/3 line. When preparing food that expands during cooking such as rice, beans or vegetables, the Cooking Pot should not pass the ½ line. Over filling the Cooking Pot may risk clogging the steam release and developing excess pressure. This may cause leakage, personal injuries, or damage to the cooker.
- How should the steam release valve be positioned for pressure cooking?
The steam release valve must be in the CLOSE position for pressure-cooking.
- Should I use the lid for the Sauté function?
No. Lid should be off while using this mode.
- How does the Slow Cook function work in comparison to a slow cooker?
Unlike other Pressure Cookers, the Hamilton Beach pressure cookers have True Slow™ technology with 3 heat settings Programmed to ensure a gradual rise in temperature, just like a traditional slow cooker. Food doesn't overcook and slow cooker recipes come out just the way you expect.
- What are the temperature settings of the Slow Cook function?
Slow Cook Mode can be used in LOW, MEDIUM, or HIGH heat.
- How do I know the Pressure-Cooking process has started?
10 seconds after pressing the settings, the cooker will beep 3 times and will display ON to indicate that the cooker has entered the preheating cycle. Depending on the amount of food and its temperature, the preheating cycle can take a few minutes to 40 minutes or more. As the cooker heats up and pressure builds, the float valve rises. When the desired pressure is reached, the cooker enters the cooking cycle and displays the remaining cooking time. When the cooking cycle is completed, the cooker will beep and switches to WARM mode.
- Why didn’t my pressure cooker beep when I selected the cooking mode or adjusted the timer?
If your unit did not beep when the cooking mode was selected or the timer was adjusted, the unit's sound may be turned OFF. While in Standby mode, press and hold the "+" to turn the sound ON . Press and hold the "-" button to turn the sound OFF.
- How do I know if I should use natural pressure release or quick pressure release?
Start by referring to the recipe. The quick release method is used when you want to stop the cooking immediately when the cycle ends. During natural release, food is still warm and may continue to cook for the amount of time it takes to release steam. Some recipes may call for natural release for a specified amount of time and then quick release to allow the remaining pressure to escape the cooker.
- How do I know when it is SAFE to open the lid?
Start by pressing ‘Stop/Cancel’. The LCD will display OFF. Always release steam before opening Lid. Additonally, make sure the float valve has dropped. Do not open the lid if the float valve has not dropped. Do not open the lid if it is locked and cannot be opened. Do not force the lid open at any time.
Note: When all pressure is released, Lid will automatically unlock. Rotate Lid counterclockwise to unlock. Remove Lid carefully, allowing excess moisture on Lid to drain back into Cooking Pot.
- What do I do if the float valve is stuck?
Verify that the unit is powered OFF. Move the steam release valve to the OPEN position. Once all the steam is released, push the float valve down with a pen or long stick.
- Are the Pressure Cooker Gaskets Food Safe?
The BPA free Pressure Cooker Gasket is UL and FDA tested for safety. The Gasket is an integral part of the Pressure Cooker safety features. The Gasket has been designed to withstand the high-pressure produced during electric pressure-cooking.
- How do I know that I have the Gasket installed properly?
The Gasket is made from food safe silicone. Under normal use it should last 2~3 years. If you notice tears, cracks, signs of leaking, deformation of the Gasket, or any other signs of damage you should replace it with a Hamilton Beach Gasket.
The Gasket is dishwasher safe; however to extend its life we reccommend handwashing it.
- Can I use another brand of Gasket?
Always replace the Gasket with Hamilton Beach branded Gasket. The use of third party Gaskets may have unexpected effects on your cooker, and will void the warranty.
- Can I Deep Fry in the Pressure Cooker?
Do not use this pressure cooker for pressure frying with oil.
- Are there any Foods that one must be cautious of or cannot be prepared in the Pressure Cooker?
Yes, be aware that certain foods, such as applesauce, cranberries, pearl barley, oatmeal or other cereals, split peas, noodles, macaroni, rhubarb, or spaghetti can foam, froth, and sputter, and clog the pressure release device (steam vent). These foods should
not be cooked in pressure cook mode. When preparing these types of food the Cooking Pot should not be more than ½ full.Note: Make sure the Steam Release Valve, Float Valve and Steam Valve Cover are clean and free from debris.
- Why does my pressure cooker take longer to cook than my recipe stated?
When a recipe notes "Cook time" (i.e. 10 minutes to cook) it does not account for the the total Pressure Cooking Process. Meaning, that it does not include the time required for the Pressure Cooker to come to pressure, cook and depressurize.
*Please note, a general guideline for pressure cooking frozen meat and poultry from a frozen state is to add 50% more cooking time than recipe recommends.
- Can I cook frozen food in my pressure cooker?
Frozen meat and poultry can be cooked from frozen state while using Pressure Cooking modes to prepare foods; however, do not use frozen meat or poultry in Slow Cook Mode.
Thaw any meat out before cooking in Slow Cook Mode.
Please note, a general guideline for pressure cooking frozen meat and poultry from a frozen state is to add 50% more cooking time than recipe recommends.
Visit www.FoodSafety.gov for safe doneness temperatures.
- What is the difference between Natural Release and Quick Release?
Quick Release: Allows the cooker to cool down quickly by letting the steam out of the cooker until the float valve drops. Never pull out the steam release valve while it is releasing steam as escaping steam is extremely hot and can cause burns. For food with large liquid volume or starch content, use the Natural Release as thick liquid may splatter out.
Natural Release: Allows the cooker to cool down naturally until the float valve drops down. This may take 10 to 30 minutes, or even longer, depending on the amount of food in the cooker. Once the cooking process is completed, turn OFF the Keep Warm mode if it is ON.
- Why is there steam coming out of the float valve during the start up procedure?
When you initially start your Pressure Cooker it is normal to see ON in the display until the Cooker preheats to the desired temperature and pressure.
As the unit preheats you should see steam come out of the float valve. The temperature rise during preheat causes pressure to build within the Cooking Pot, which in turn causes the float valve to rise. When the float valve seals, the lid will lock.
Next, the timer countdown will start on the display. At this point there should be very little steam leakage.
- Pressure is not building why?
Liquid is required to create steam and build pressure in the Pressure Cooker. Always add a minimum of 1 cup (237 ml) of water or other liquid.
Not setting the steam release valve to the CLOSE position for pressure-cooking. If it is not sealed, pressure will not build.
Gasket is not installed properly.
- How do I know if I should use Natural Release or Quick Release?
Start by referring to the recipe. The Quick Release method is used when you want to stop the cooking immediately when the cycle ends. During natural release, food is still warm and may continue to cook for the amount of time it takes to release steam. Some recipes may call for natural release for a specified amount of time and then quick release to allow the remaining pressure to escape the Cooker.
- What should I do if my Pressure Cooker Displays Error Codes 1-6?
Unit is malfunctioning; call Customer Service.
- Why won't my cooker turn ON?
• Make sure outlet is functioning properly.
• Check to be sure Power Cord is securely inserted into Power Cord Port and securely plugged into outlet. - Why is the lid difficult to close?
• Make sure Gasket is inserted properly in the underside of Lid.
• If Cooker has been used to Brown/Sauté or is still warm from previous cooking, there may be a small amount of pressure in Cooker. Move Steam Release Valve to OPEN position, close Lid and then move Valve to CLOSED position. - Why won't the lid lock?
• Gasket is not installed properly.
• Debris may be blocking Gasket or Valves. Make sure all are clean and free of food. - Why is steam escaping from the pressure cooker during cooking?
• It is normal for some steam to come out of the Float Valve until the Cooker comes to pressure and Lid is locked.
• Lid may not be closed and locked properly.
• Gasket may not be inserted properly or needs to be replaced. Steam Release Valve may not be in the closed position.
• Valves or Gasket may need to be cleaned to remove debris. See “Care and Cleaning.” - Why can't I remove the lid?
Pressure must be completely released before Lid is unlocked.
See “Releasing Steam” instructions in “Meet Your Pressure Cooker.”
- Why is my Pressure Cooker spattering when steam is released?
Cooking Pot may be overfilled. Fill no more than 2/3 full, or 1/2 full for foods that expand, such as rice and beans.
If spattering occurs, wear an oven mitt to protect hand and release pressure in short bursts or allow to natural release.
- Why does my Pressure Cooker take so long to come to pressure?
Amount of time to bring to pressure depends on amount of liquid and food in cooking pot. Starting temperature of food may also extend time.
*Please note, a general guideline for pressure cooking frozen meat and poultry from a frozen state is to add 50% more cooking time than recipe recommends.
- Why is my food not done?
• More cooking time is needed. Reset cooking mode and adjust for additional time, or set Cooker to BROWN/SAUTÉ and allow food to simmer longer.
• If LOW pressure was used, try using HIGH pressure next time.
• Make sure there is enough liquid to create steam and build pressure. A minimum of 1 cup (237 ml) liquid is recommended. - Why is my food overcooked?
• Make sure the proper pressure and cooking time was selected.
• Reduce cooking time or select LOW pressure.
- Are my products safe?
The U.S. Food and Drug Administration (FDA) establishes requirements for food contact surfaces to ensure that they are safe for their intended use. Our products comply with all applicable FDA requirements. For more information, please visit https://www.fda.gov/food/chemical-contaminants-food/authorized-uses-pfas-food-contact-applications. The California and Colorado laws provide transparency to consumers about their cookware products, and Hamilton Beach shares this same commitment to transparency. If you have additional questions, please contact Customer Service at https://hamiltonbeach.com/customer-service.
- What is California’s cookware disclosure law?
AB 1200 is a California law that requires manufacturers of cookware to provide labels and websites to inform consumers of certain chemicals that may be used on the surface of cookware or its handle. The law requires labels on cookware to list chemicals used in the product formulation and provide links to California’s information on these chemicals.
- What is Colorado’s cookware disclosure law?
HB 22-1345 is a Colorado law that requires manufacturers of cookware to provide labels and websites to inform consumers of the use PFAS chemicals on the surface of cookware or its handle. The law requires labels on cookware to list PFAS use in the product formulation and provide information on the function of PFAS on the product.
- How do I find my product on the website?
If you clicked through to the information website directly from your product’s page, your model number should be pre-filled in the box. If you did not click through from the product’s page or for some other reason the search box was not pre-filled with your product’s model number, please enter it into the search box and press the “search” icon. Your product’s model number can be found on the product display page under the product name. Also, the model number can be found on (i) the product, at the rating label located on the bottom or rear of the product; and (ii) one or more panels on the packaging, usually above the UPC barcode. If you have any difficulty or questions, please contact Customer Service at https://hamiltonbeach.com/customer-service.
- What materials are the lid and body made of? Insert pan? Lift rack?
- Lid and body: Lid is made of aluminum and the body is powder-coated steel.
- Insert pan: Steel with FDA-approved Porcelain Enamel.
- Lift Rack: Plated Steel.
- Where is the heat located?
The heating element is a wrap around element and is located within the inner wall.
- Is the 18 quart size the only size you manufacture?
No, we manufacture 5 qt (750 watts) and 18 qt (1440 watts) sizes.
- Where can the model and series number be found on the roaster oven?
On the bottom of the unit.
- Can I cook corn on the cob in my roaster oven?
Yes. Pour 1/2 inch water inside the removable pan (not under it) and place desired number of ears of corn in the water, set temperature to 500 degrees. When the oven starts steaming, cook for 10-15 minutes. Adjust time if necessary.
- What purpose do the metal clips on each side of the body handle serve?
The metal clips serve as a lid holder, and are on each side for left- and right-handed use.
- Miscellaneous Information
The Roaster Oven can be used as a buffet by purchasing the buffet accessory. 1-800-851-8900
- The grill is pre-seasoned. Does it need oiling before first use?
This cast iron grill comes seasoned and ready to use. Rinse, dry thoroughly, and start cooking. Foods can be sticky on new cast iron, so oil the cast iron cooktop to ensure that even stubborn foods will release easily.
- What does “seasoned” mean?
- Seasoning is a term that describes creating a hard protective coating on the cast iron by rubbing a thin layer of oil on the surface and heating. It's what gives your skillet or grill that classic black patina look.
- Seasoning forms a natural, easy-release cooking surface and helps prevent your pan from rusting.
- A well-seasoned cast iron pan can last for generations.
- Can metal utensils be used?
Yes. Cast iron is a naturally hard, scratch-resistant surface.
- How hot can this grill be set?
Temperature on this grill is adjustable from warm to 450°F
- What temperature should I set the grill?
- Warm-225°F: Keep Warm – Hold cooked foods at serving temperature
- 225°F-325°F: Warming/Frying – Warming foods, scrambled eggs, fried eggs, omelets
- 325°-375°F: Saute/Grilling – French toast, pancakes, grilled sandwiches, fish, bacon, vegetables
- 375°F-400°F: Searing – Pork chops, lamb chops, sausage, boneless chicken, hot dogs
- 400°F-450°F: Browning/Blackening – Steaks, burgers, scallops, browning large cuts of meat, stir-fry
- Is cast iron a better cooking surface than other metals?
Cast iron is slower to heat than other metals, but once heated, it maintains consistent, even heat better than aluminum.
- What foods can be cooked on this grill?
The large cooktop surface makes it perfect for cooking many family meals. Cook bacon, eggs, pancakes, hash browns for breakfast. Try grilled cheese, hamburgers and sandwiches for lunch, or sear steaks, chicken, kebobs or seafood for dinner.
- How large is the grill?
10 inches x 16 inches
- What is the warranty?
This grill has a 3-year limited warranty.
- Can I break my cast iron cooktop?
Yes, your cast iron cooktop can break if dropped or not cared for like any other cookware.
- What is the best way to maintain the seasoning on cast iron?
- Using the cast iron grill for all types of food will build the natural non-stick coating.
- Oil the surface with a high smoke point oil such as canola, or peanut oil. Corn, olive, sesame seed, or sunflower oil has a lower smoke point, and still acceptable for grilling.
- Do not use aerosol non-stick cooking sprays.
- Use water and high acidic foods sparingly on cast iron.
- Keep surface dry to prevent rust.
- Can cast iron be washed with soap and water?
- Harsh abrasives, acidic foods and exposure to water can break down the finish or cause rust.
- Use soap and water sparingly.
- Always dry thoroughly before storing the grill.
- How can stuck on foods be removed?
- While the grill is hot, the surface can be deglazed with a small amount of liquid.
- Preheat cast iron grill to 300°F.
- Protect hands with oven mitts, over the top of the preheated cooktop, pour about 1/4 cup water.
- Let water bubble to dislodge residue.
- When bubbles subside, scrape water and residue into drip tray. Let grill cool. Scrub with a small amount of soap and water if necessary. Rinse and dry thoroughly. Oil surface before storing.
- Alternately, when grill is cool, it can be scrubbed with Kosher salt, rinsed and dried thoroughly. Rub with oil before storing.
- How often should cast iron be re-seasoned?
When foods begin to stick or the pan loses it's shiny black finish, the grill should be re-seasoned.
- What should I avoid when caring for my cast iron?
Do not leave in sink to soak, put in dishwasher, allow to air dry, or store in a moist area. Any of these will cause rust since preseasoned layers have been disturbed and moisture has been in contact with your cast iron.
- Why doesn't grease drain into drip tray?
The cooktop is a flat surface. It is designed to easily scrape fat and drippings into the drip tray when done cooking.
- What to do if rust spots occur?
- Allow grill to cool completely.
- Remove cooktop from base.
- Scrub rust spots with steel wool.
- Rinse with water and dry thoroughly.
- Re-season by following directions in Troubleshooting > How is the cast iron grill re-seasoned?
- How is the cast iron grill re-seasoned?
- Remove cast iron grill from base.
- Rub a top of grill with a thin layer of oil.
- Wipe off excess.
- Place grill upside down on oven rack.
- Place a long sheet of alumium foil on rack under cast iron grill to catch any drips.
- Bake at 450°F for 1 hour.
- Allow to cool completely in oven.
- Why is my cast iron cooktop is sticky?
It is over seasoned with too much oil.
- Place cooktop upside down on top rack in oven.
- Add a long piece of heavy-duty (18-inches) aluminum foil directly under the cooktop onto lower rack to catch any drips.
- Bake at 450°F (232°C) for 1 hour.
- Allow to cool completely in oven.
- The safeguards in the Use & Care manual state to unplug the Slow Cooker after use. Is this really necessary?
Yes. You should unplug all countertop electric appliances when finished using.
- Can I reheat food using the Keep Warm Setting?
Do not reheat food on Keep Warm Setting. The Keep Warm Setting should only be used after a recipe has been throughly cooked. Food must be hot enough to prevent bacterial growth before using Keep Warm Setting. If food has been cooked and then refrigerated, reheat it on Low or High; then switch to Keep Warm.
- What is the wattage of the slow cooker?
The wattage is located on the bottom of the appliance.
- Is the crockery liner oven, stovetop, microwave, and dishwasher safe?
The crocks are microwave, oven and dishwasher safe. Do not use on stovetop.
Helpful Hint: Crocks are vulnerable to thermal shock, which is a condition caused by extreme changes in temperature. Never put a hot crock in cold water.
Are the crock and lid covered by warranty? - How do I remove the crock?
Use hot pads or mitts to remove the crock.
- Does lifting the lid hinder cooking?
Yes, lifting the lid results in major heat loss which can cool the food load.
*Helpful hint: Stirring is not necessary when slow cooking. Removing glass
lid allows large amounts of steam to escape and thus the cooking time may need to
be extended. However, if cooking on High, you may want to stir
occasionally. - Is it normal for the slow cooker to boil?
A slow simmering boil is normal, however a rapid boil is not.
- Can I store food in my crock?
Yes, but do not expose the crock to a sudden temperature change or the crock could crack due to thermal shock.
- What size Slow Cookers are available?
HB currently makes 6 different size Slow Cookers: 3, 4, 5, 6, 7, & 8 quart models.
- Is it normal for the outside bottom of the crock to be rough?
Yes, the crocks are not glaze finished on the bottom surface.
Helpful Hint: The bottom of the crock is very rough and can damage the countertop. Use caution.
- Why does the glass lid sit so loosely on the crock?
The lid is intentionally loose in order to let small amounts of steam escape.
- Does the crock contain lead?
Hamilton Beach specifications applicable to all slow cookers and their components (including the earthenware crocks) prohibits the product from containing any measurable amounts of lead. Furthermore, the factories that manufacture the earthenware crocks for Hamilton Beach are certified ceramic production facilities whose ceramic ware is deemed to satisfy FDA heavy metal requirements. Hamilton Beach takes all reasonable steps to ensure that the earthenware crocks accompanying our slow cookers provide safe and satisfactory service to our consumers.
- Should the bottom and legs get warm?
Yes. Although plastic is an insulator, it will heat up somewhat but will not melt.
- Why does the exterior of my Slow Cooker get so hot?
The sides of the slow cooker’s base get very warm because the heating elements are located here.
- How do you measure the quart size of the Slow Cooker?
Like current Slow Cooker Industry practices, the quart size of our Slow Cooker Crocks are determined by measuring the total capacity to the overflow line.
- Where can I find recipes for my slow cooker?
Additional recipes are available on our website at http://www.hamiltonbeach.com/recipes.
- What is the odor I smell when first using the slow cooker?
The odor is coming from the heating element as it heats up for the first time. This is called “burn off” and is normal. It should subside within the first use.
- What material is the lid screw made of?
Stainless steel, aluminum or a non-corrosive, non-toxic material. Select models have a plastic lid including model 33430.
- Is it normal for condensation to accumulate on the lid?
Yes. It is normal for condensation to accumulate on both glass and plastic lids. Remember - try not to lift the lid often.
*Helpful hint: Each time the lid is lifted, it lengthens the cooking time.
- Is it safe to put my hot cooking vessel pot in the carrying case?
Yes. The carrying case was made for safely handling a hot cooking vessel. However, do not place the cooking vessel pot in the carrying case and then re-plug.
- When my slow cooker is on the low setting, why does it boil?
Our slow cookers will boil on the low setting, but only near the conclusion of cooking time (last hour). When a slow process is used to cook meat, the temperature of the contents should be brought up to 125° F within 3 hours and rise quickly to 165°.
- Can I use my slow cooker for warming leftovers?
No. The slow cooker must maintain a certain temperature in order to kill bacteria.
- What temperature does my slow cooker need to be at when cooking meats?
As per USDA guidelines, meats need to be kept above 140° F to avoid dangers of food poisoning.
- How much food can I put in my slow cooker?
For best results, the slow cooker should be at least half-full and no more than 3/4 full.
- Am I supposed to have the 'One Step Prep Slow Cooker Recipe Book' packed with my unit?
This cookbook is supposed to be packed only with the 6.5 quart oval slow cookers.
- Can you tell me what temperature my slow cooker cooks on at various settings with an empty cooking vessel?
The slow cooker does not work like an oven, as it slowly rises in temperature to cook over a longer period of time. The tempertaures for each setting are High: 200-225°F Low: 180-200°F Keep Warm: 165°F.
- How long can food be kept on the “keep warm” setting of a slow cooker?
The keep warm setting can be used for up to 2 hours for some foods. Food safety is not affected, but quality of some types of food will continue to decrease the longer the food is “kept warm.” Foods like chili or spaghetti sauce will be fine.
- What causes the recipe for Cheddar Broccoli Soup to curdle and appear to be overcooked?
The recipe needs to be followed exactly. The recipe requires using frozen broccoli. Using fresh or cooked broccoli will cause the soup to appear curdled.
- Can I use frozen, uncooked meat in the Slow Cooker?
Do not use frozen, uncooked meat in the Slow Cooker. Thaw any meat or poultry before slow cooking.
- Do the cooking vessels made in China contain lead?
Lead and cadmium are naturally occurring elements in the earth. As cooking vessels are earthenware cooking vessels, lead and cadmium may be naturally present. HBB cooking vessels are porcelain enamel coated to create a barrier between food and earthenware. The porcelain enamel coated cooking vessels are evaluated using ASTM extraction test procedures with detection limits of 0.1 ug/ml for lead and 0.01ug/ml for cadmium. In HBB cooking vessels, the amount of lead or cadmium present in the extractant is below the test's limits of detection. Additionally, the factories that manufacture HBB cooking vessels are certified ceramic production facilities whose ceramic ware is deemed to satisfy FDA heavy metal requirements in accordance with the Memorandum of Understanding between the United States and China. HBB takes all reasonable steps to ensure that our cook vessels provide safe and satisfactory service to our consumers.
- Why does my slow cooker cook so much faster than my older slow cookers?
Modern slow cookers use a higher wattage so any bacteria that is present will be killed within an appropriate amount of time.
- Which models include the Stay or Go lid latch?
Models 33390, 33475,33550, 33575, 33740, 33675, and 33690.
- Can a slow cooker cause electrical interference with a television?
A slow cooker is a resistive heating type of appliance and therefore should not create any electromagnetic interference (like a motor driven product can do).
- What kind of material is the slow cooker lid latch made of?
The lid latch is made of silicone.
- Are the heating elements only at the bottom of the cooker or do they wrap around and up the sides?
There are two heaters that wrap around the sides (typically, one is used for Keep Warm, one is used for Low & both are used on High).
- What is the gasket on the lid of the Stay or Go slow cooker made of?
The gasket on the lid is made of Food Safe Silicone that is tested and approved by the FDA.
- How much water do you put in the cooking vessel for the Banana Bread Pudding recipe?
This recipe is for the double dish slow cooker, which requires water to be placed in the cooking vessel while cooking in the insert pan (like a double boiler). When making in the cooking vessel, no water is needed.
- Why does my food cook too fast?
If your slow cooker is filled less than halfway, your food will cook faster. Optimal cooking capacity for a slow cooker is 1/2 to 3/4 full.
- Are slow cookers hotter than the original ones from the 1970's?
Yes. Slow cookers have changed over the years to meet food safety guidelines set by the UDSA. Slow cookers do not have thermostats, so they do not have temperature ratings for Lo and Hi settings. Lo simply uses less watts and takes longer to get to the same cooked temperature. This temperature will approach boiling.
- Does the cooking vessel contain lead?
No. There is no lead or cadmium in our porcelain enamel coated cooking vessels.
- Are the brown 4 quart and 6 quart liners available for purchase?
No, the brown liners are no longer available. However, you can purchase a white or black liner; they will accommodate your slow cooker.
- Why am I getting a message to insert the probe when it's already inserted?
The probe may be dirty. Remove probe from slow cooker, clean the probe with a cotton cloth and re-insert.
- For the model 33690, the back of the slow cooker seems much hotter than the front. Is this normal?
Yes. The heater starts at about 1.5 inches on both sides of the switch and runs towards the back. The hottest portion of the slow cooker is on the opposite side of the switch.
- How can I prevent scorching when using the tea candle?
The Tea Candle wick on the Party Crock should be kept trimmed to about 1/4 inch to prevent any scorching.
- Should I close the clips or use the Lid Latch™ on my Stay or Go® Slow Cooker while cooking?
NO. The Lid Latch™ or Wire Clips help secure Lid while moving or transporting. NEVER lock Wire Clips or use Lid Latch while cooking.
- What is the rubber gasket made of?
Silicone rubber.
- Can my cooking vessel be placed in the oven for reheating?
Slow cooker cooking vessels may be heated in an oven, but the glass lids cannot because the plastic knob on the lid could melt or burn.
- Where’s the model, product type and series number located on my slow cooker?
Model number, type number, series code, and wattage information is located on the rating label. The rating label is located on the bottom of your Slow Cooker.
- How do I know which parts of my Slow Cooker are replaceable?
Visit www.hamiltonbeach.com/parts. Replacement parts or accessories can be searched via the model number (Option One or by Category (Option Two). If you cannot find the replacement part or accessory you need call US: 1.800.851.8900, Canada: 1.800.267.2826, Mexico: 01 800 71 16 100.
- How do I determine the watts of my slow cooker?
Wattage information is located on the rating label. The rating label is located on the bottom of your Slow Cooker.
- How do I determine the amps of my slow cooker?
The amps are determined by dividing the volts into the watts. Example: volts= 120, watts=1000, therefore 1000 divided by 120 = 8.3amps.
- How to achieve the best recipe results in a Slow Cooker
For best results, fill Crock 3/4 of the way full but no more than 1 inch (2.5 cm) from the rim. If only half-filled, check for doneness 1 to 2 hours earlier than recipe states.
- How to remove Lid and Crock
When removing lid, tilt so that opening faces away from you to avoid being burned by steam. The sides of the slow cooker’s base get very warm because the heating elements are located here. Use handles on base if necessary. Use oven mitts to remove crock.
- How to transport Slow Cooker (optional feature on select models)
The Lid Latch™ or Wire Clips help secure Lid while moving or transporting. NEVER lock Wire Clips or use Lid Latch while cooking.
Place Lid Latch™ into groove under one Handle. Stretch to other side and secure in groove under other Handle. Once attached, Lid Latch™ can also be crossed over knob to further secure Lid.
Or, to use Wire Clips, move clips up onto Lid and push down on top of clip latch to secure Slow Cooker for transporting.
- Why does my slow cooker lid have a hole/vent in it?
The Lid hole/vent allows excess steam to escape to avoid build up.
- Can I submerse the base in water?
Do not immerse cord, plug, or base in any liquid.
- Is my Slow Cooker Dishwasher Safe?
The Lid and Crock may also be washed in a dishwasher. DO NOT use the “SANI” setting when washing in the dishwasher. “SANI” cycle temperatures could damage your product.
- What cooking modes are available?
Low, High, and Keep warm.
- How long does keep warm last?
The Keep Warm will remain ON until the knob is returned to the OFF (O) position. Set a kitchen timer to keep track of the ON time.
- Will the Slow Cooker shut off automatically?
No, turn control knob counterclockwise to OFF (O) when cooking is complete.
- What programmable modes are available?
We offer a variety of Programmable Slow Cookers that range from a simple mix and match of pre-set times and temperatures to more complex customizable cooking functions that allow the selection of specific times and temperatures.
- Is stirring necessary when Slow Cooking?
Stirring is not necessary when slow cooking. Removing Lid results in major heat loss and the cooking time may need to be extended. However, if cooking on HIGH, you may want to stir occasionally.
- How much space should I leave between the top of the Crock and the food when cooking soups or stews?
If cooking soups or stews, leave a 2-inch (5 cm) space between the top of the Crock and the food so that the recipe can come to a simmer.
- Can I prep food the night before if my morning schedule does not allow time to prepare a recipe?
Many recipes call for cooking all day. If your morning schedule doesn’t allow time to prepare a recipe, do it the night before. Place all ingredients in Crock or food safe container, cover with Lid, and refrigerate overnight. In the morning, simply place the Crock in Base and start cooking.
- What should I consider when choosing recipes for a Slow Cooker?
When choosing recipes for a Slow Cooker, look for recipes that call for cooking on HIGH 4 to 5 hours or LOW 6 to 8 hours. Recipes calling for less cooking time should be checked periodically for doneness.
- What foods are not suited for extended cooking in a Slow Cooker?
Some foods are not suited for extended cooking in a Slow Cooker. Pasta, seafood, milk, cream, or sour cream should be added 2 hours before serving. Evaporated milk or condensed soups are perfect for slow cooking.
- How does the fat content of meat affect how much liquid is needed when Slow Cooking?
The higher the fat content of meat, the less liquid is needed. If cooking meat with a high fat content, place thick onion slices underneath so meat will not sit on (and cook in) fat.
- How much liquid should I use when making soup, stew or sauce?
Slow cookers allow for very little evaporation. If making your favorite soup, stew, or sauce, reduce liquid called for in original recipe. If too thick, liquid can be added later.
- When Slow Cooking a vegetable-type casserole, how can I prevent scorching on the sides of the Crock?
If cooking a vegetable-type casserole, there will need to be liquid in the recipe to prevent scorching on the sides of the Crock.
- Where can I find more information on safe internal cooking temperatures?
Please visit foodsafety.gov or fsis.usda.gov for more information on safe internal cooking temperatures.
- Can I refrigerate leftovers in the crock?
To store leftovers after cooking, do NOT place the entire Crock in the refrigerator since contents will take too long to cool. Instead, divide leftovers into smaller containers and place into refrigerator.
- Can I leave under cooked or raw meat in the Slow cooker until I'm ready to prepare my meal later in the day?
Never allow undercooked or raw meat to sit at room temperature in the Slow Cooker. Once meat is placed into the Crock, it should be cooked immediately (unless prepping Slow Cooker the night before, where Crock should be placed into the refrigerator).
- Are stove top safe cooking pots available?
Yes, we have Slow Cookers that offer cooking pots that allow you to sear or brown meat on your stovetop, then finish meal in Slow Cooker. A few models to check out are 33265, 33662, and 33663.
- What is the proper way to clean my Slow Cooker?
WARNING! Electrical Shock Hazard. Disconnect power before cleaning. Do not immerse cord, plug, or base in any liquid.
1. Unplug and let cool.
2. Use oven mitts to remove Crock.
3. Wash Lid and Crock in hot, soapy water. Rinse and dry. The Lid and Crock may also be washed in a dishwasher.
DO NOT use the “SANI” setting when washing in the dishwasher. “SANI” cycle temperatures could damage your product.
4. Wipe Base with a soft damp cloth or sponge and dry.
5. Do not clip Lid during storage (optional feature). - How can I ensure long life of my Slow Cooker Lid and Crock?
Avoid sudden, extreme temperature changes. For example, do not place a hot lid or crock into cold water, or onto a wet surface.
• Avoid hitting crock or lid against faucet or other hard surfaces.
• Do not use crock or lid if chipped, cracked, or severely scratched.
• Do not use abrasive cleansers or metal scouring pads.
• The bottom of the crock is very rough and can damage the countertop. Use caution.
• The crock and lid can become very hot. Use caution. Do not place directly on any unprotected surface or countertop.
• The crock is microwave-safe and oven-proof, but never heat crock when empty. Never place crock on a burner or stove top.
• Do not place lid in a microwave oven, conventional oven, or on stove top. - Is my Crock microwave, stove top or oven safe?
The crock is microwave-safe and oven-proof, but never heat crock when empty. Never place crock on a burner or stove top.
Helpful Hint: Crocks are vulnerable to thermal shock, which is a condition caused by extreme changes in temperature. Never put a hot crock in cold water.
- Should I clip the Lid during Storage?
Do not store with Lid clamped down.
- Where can I order replacement parts?
To order replacement parts:
Visit www.hamiltonbeach.com
or Call
US: 1.800.851.8900
Canada: 1.800.267.2826
Mexico: 01 800 71 16 100 - Can I purchase a heating element or any internal part?
No. We do not intend for Slow Cookers to be repaired. Internal parts are not sold to consumers.
- What material is the Stay or Go® Lid Latch™ made of?
The lid latch is made of Food Safe Silicone that is tested and approved by the FDA.
- Why is my food under cooked?
• Was food cooked on the KEEP WARM setting? Only cook on LOW or HIGH setting.
• Was power interrupted?
• Did you select the LOW heat setting, but used a cooking time based on the HIGH heat setting?
• Crock was overfilled. For best results, fill Crock no more than 1 inch (2.5 cm) from the lid.
• Lid was not placed correctly. Check to make sure Lid is seated properly on the crock. - Why was my food overcooked?
• Foods will continue to increase in temperature after desired temperature has been reached. Check food when cooking time has been reached.
• Did you select the HIGH heat setting, but used a cooking time based on the LOW heat setting?
• Crock was less than half full. Check for doneness 1 to 2 hours earlier than recipe states. - Why isn't my food done cooking after the amount of time recommended in my recipe?
This can be due to voltage variations (which are commonplace everywhere) or altitude. The slight fluctuations in power do not have a noticeable effect on most appliances. However, they can alter the cooking times in the Slow Cooker by extending the cooking times. You will learn through experience if a shorter or longer time is needed.
- Why is there no bell or tone to notify me that my toast is finished?
There are various features for individual models. Some older models were not designed with a bell. Current models have a lever that pops up. The IntelliToast™ Toaster Oven/Broilers do have a "toast ready" tone.
- Can you explain how to turn the rack over to have it in the high or low position?
Open the door to remove the rack, flip it over, and re-install on the correct guides. For illustrations, consult your Use & Care guide.
- What position should the rack be in for toasting, baking, or broiling?
- Toasting bread and frozen pastries - UP
- Toasting bagels and most baking - DOWN
- Broiling requires use of pan and broiling rack in the UP position.(this feature found on selected models).
- With what should I clean the pan and broil grid?
Hand clean using hot soapy water per your Use & Care Guide. You can place the pan and broil grid in the dishwasher, but this will discolor it.
- What is the wattage and voltage of the oven?
This information is stated on the bottom of the product. It will vary by model.
- How do you top brown when both elements are on?
Since top browning is generally a quick process, the bottom elements will not affect the results.
- Why are the knobs more difficult to turn on models O3005 and O3008?
These are "manual models" and a characteristic of that design.
- Which toaster ovens come with the pan and grid?
The ovens with the broil feature include a pan and grid.
- Why doesn't the door close tightly?
There is a hidden spring that closes the door. If the tension in the spring has stretched, the door will not close flush with the unit.
- What causes my oven to turn dark and around the control knobs?
Some discoloration will occur through time and use of the product.
- What are the external measurements?
Our current models measure 16" wide, 11" deep, and 7-1/4" high across the widest points.
Model 31410: 16" wide, 11" deep, and 9" high. - Can I use Pyrex® or glass baking dishes inside the oven?
Most manufacturers of glass ovenware do not recommend using their product in any type of toaster oven.
- Can I use aluminum foil in the oven?
Yes, but do not allow it to come into contact with the heating elements. Do not use to cover the crumb tray.
- What can I clean the inside of the oven with?
Non-abrasive cleaners. Do not use oven cleaners.
- Which elements should come on during the various settings?
- Broil: top and bottom on some units; top only on others
- Bake: top and bottom during preheat, then both cycle
- Top Brown: top and bottom on some units; top only on others
- Toast: top and bottom
- What are the inside dimensions of the toaster oven?Our current models measure 11" wide, 9" deep, and 5" high.
Model 31410: 11-1/4" wide, 9-1/4" deep, and 4" high.
- Explain the Foreign Voltage Adapter & Converter Set process.
The adapter: The purpose of the adapter is to adapt the appliance with the correct plug to fit the foreign wall outlet, and for that reason, it can only be used with products that have dual voltage (120 & 220 volts). The adapter is for short-term use only (5 minutes at a time).
To use the adapter:
- Flip the appliance to the correct voltage (120 or 220)
- Find the correct adapter plug for that country
- Plug the appliance into the adapter
- Plug the adapter into the outlet, ready for short term use
The converter: The purpose of the converter is to convert 120 volts up to 220 volts, for that reason the converter can only be used on 120 volt appliances only, it will not convert a 220 volt appliance down to 120 volt. The converter is for short term use only (5 minutes at a time).
To use the converter:
First, check to see if the converter will plug into the wall outlet.
- If it will:
- Plug the appliance into the converter
- Plug the converter into the wall outlet, ready for use.
- If the converter will not plug into the wall outlet:
- Find the correct adapter
- Plug the adapter into the wall outlet
- Plug the converter into the adapter
- Plug the appliance into the converter, ready for short-term use.
- If a converter is only for short term use, is there a product available for long term use?
Yes, a transformer is for long term use. Currently HBPS does not offer transformers.
- Can the adapters be used on electronic type products, such as computers?
No, and do not use them on ALCI Ground Fault Interrupter outlets and/or reset buttons.
- How long can I use the adapter at a time, and how long will it last?
The adapters are designed for short-term (vacation) use. Short term can be defined as 5 minutes at a time. Although we can't estimate exactly how long the adapter will last, this product comes with a two year warranty.
- What will happen if I use the adapter long term? (Long term can be defined as over 5 minutes daily)
It will shorten the life of the adapter and the product.
- Does the product need to have a certain wattage in order to use the adapter?
Yes, the adapter can only be used on products with 50 - 1600 watts.
- Why didn't the adapter fit the foreign wall outlet?
Adapters are designed to fit the most current country electrical codes or electrical configurations. If the adapter did not fit, it's most likely because the wall outlet was obsolete. Contact Customer Service for an exchange or refund.
- Can I purchase extra fuses?
Yes, extra fuses can sometimes be found at local hardware stores, Radio Shack, and at some discount stores. The fuse is 10 amps, but it is best to simply take the fuse with you and compare size. The fuse is also sold through HBPS. Contact Customer Service.
- What temperature does the waffle baker reach and cook at?
The waffle baker cooks at 400 degrees.
- How can I get the spindle to stay in?
We recommend 2/3 cup for the regular grid waffle baker and 3/4 cup for the Belgian grid waffle bakers.
- How long should I preheat the waffle baker before cooking on it?
At least five minutes